Configure System Restore In Windows 10: Full Guide
System Restore is one of those tools that every tech savvy person should know how to use. If something goes wrong with your PC, it’s often possible to go back to a previous date and fix things without having to reinstall everything. You might want to do this to recover accidentally deleted files, or maybe you just don’t like the way your system looks today. Whatever the reason, here’s how to use System Restore on Microsoft’s latest operating system.
Here you’ll find options for enabling automatic backups and restoring points. Clicking the Create option will bring up the wizard where you can select what type of restore point you want to make. For example, you could choose the default setting of Last Known Good, which will automatically create a restore point based on the last working configuration of your PC. Or you could opt for Custom, which lets you pick specific dates and times to create restore points.
You can also choose whether to keep the restore point forever, or delete it once you’re done fixing whatever issue brought you there in the first place. Finally, you can decide whether to allow apps to run while System Restore is active. This is important because some programs may interfere with the process.
Once you’ve selected your settings, click OK. From here you can see all the restore points you’ve created, along with the amount of space used by each one. To restore a particular restore point, simply select it and click Restore.
If you want to undo a change you’ve made to your PC, you’ll need to start over again. So if you’ve changed your desktop wallpaper, for instance, you’ll want to go back to the original image. To do this, click the arrow next to the restore point you want to revert to, and then click Delete.
How to Enable Windows 10 System Restore
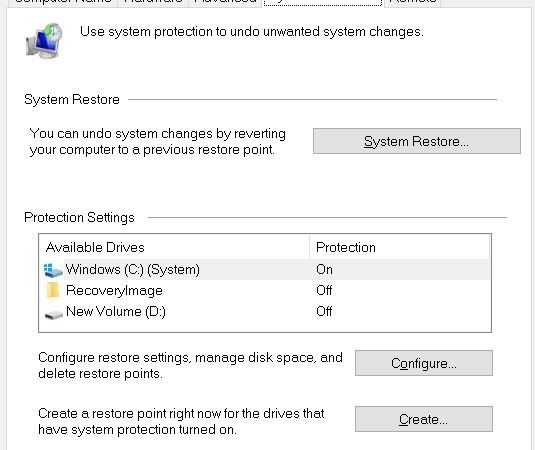
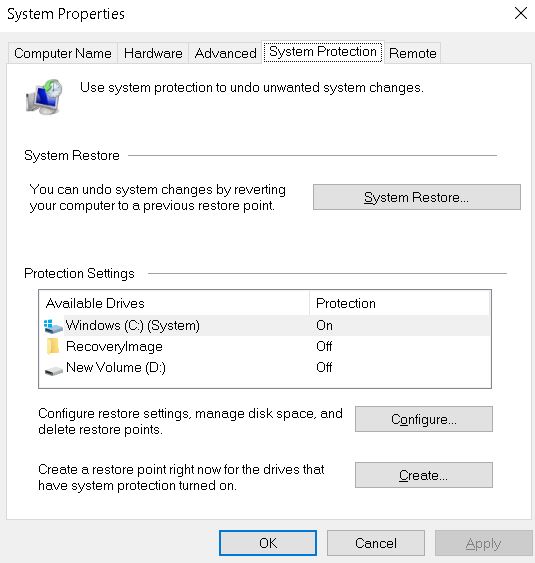
To turn off System Restore, open the System Properties window, go back into the Control Panel, select the System Protection tab, and uncheck the box beside Turn on system protection. You can also do it manually by opening up the command prompt (cmd), typing net stop srm /f /t 0 and pressing Enter.
There are two ways to turn System Restore on: either through the control pannel or manually. If you want to use the control panel method, follow these steps:
1. Open the System Properties window, navigate to the System Protection tab and check the box next to Turn On System Protection.
2. Click the Create button.
3. In the dialog box that appears, type a name for your backup and press OK.
4. Select the location where you want to store the backups and press Next.
5. Press Finish to complete the process.
On Windows 10, how do you make a System Restore point?
If you’re looking to make sure that your computer doesn’t go haywire again, it might be worth making a System Restore Point. This way, you’ll always know what the system looked like prior to whatever happened causing it to crash or freeze up. If something goes wrong, you can simply roll back to the state of your PC when everything was working fine. Here are the steps to creating one:
1. Open the Start menu and type “System Restore.”
2. In the search bar, enter “Restore my computer,” and press Enter.
3. Select the option “Create a restore point now,” and select Next.
4. You’ll see a screen prompting you to choose where to save the restore point. Choose somewhere safe and free.
5. When prompted, type a description for the restore point. For example, I named mine “Before I messed things up!”
6. Once you’ve saved the restore point, click Finish.
How to Restore System Restore in Windows 10
Windows 10 includes a built-in tool called System Restore that allows you to roll back changes to your computer. You can use it to undo recent system changes such as installing apps, changing settings, or even upgrading to a newer version of Windows. In this guide we’ll show you how to restore your PC to a previous state using System Restore.
Step 1: Open the Control Panel
Start typing “Control panel” into the Cortana Search box. When you see the control panel icon, tap it to open it.
Step 2: Click System and Security
This opens the System Properties dialog box where you can choose what actions are allowed for System Restore.
Step 3: Choose Restoring Options
Click the arrow next to System Restore. A list of options appears. If you want to start over completely, uncheck everything except the option labeled Reset this PC. Otherwise, check off each action you want to allow.
Windows Isn’t Booting? How to Carry Out a System Restore
To access the Advanced Startup Options Menu, press and hold the Power Button until the Windows logo appears. Press and hold it again to shut down your PC.
When your PC won’t start up normally, you’ll want to access the Advanced Startup Options. Choose Restart. This will restart your PC and hopefully allow you to boot normally. From here, select Startup Repair.
If you’re unable to access the Advanced Startup Menu, you could perform a system restore. In fact, it’s recommended that you do so whenever possible.
The System Restore utility lets you go back to an earlier version, or restore points, of Windows. These are snapshots of your hard drive taken every time you turn off your PC. They can help you recover from certain issues, such as malware infections or hardware failures.
Before restoring your PC, make sure you have backed up your data. Also, keep in mind that some applications might stop working properly once you restore your operating system.
How to free up disk space on a drive by deleting all restore points
Go to the System Protection window. Find the button for deleting all the restore points. Press it. This will delete all the restore points on that drive, making sure that you don’t lose anything important. If you want to keep some restore points, just go to the System Protection window again and select the option to “Restore previous versions.” You’ll see a list of all the restore points, including the ones you’ve selected. Select the one you want to keep and press OK. Now you’re good to go.
Undo system changes made from the desktop
If you’ve been working on a document on your computer, it’s likely that you’ll make some changes along the way. You might add a table, change a font size, or delete something important. If you’re like most people, you probably just keep adding things to your file without thinking about what happens if you later decide to go back and undo those changes.
Fortunately, there are ways to save yourself from losing work if you accidentally mess up a file. Here are three tips to help you avoid losing data.
1. Back Up Files Before Making Changes
Before you start editing a file, take a few moments to back up the original version. This way, if you do make changes, you won’t lose anything. To do this, open File Explorer and navigate to the folder where the file lives. Right-click on the file and select “Backup.” You can now safely edit the file. Once you finish, simply choose “Restore” from the menu bar and you’ll be able to access the previous version of the file.
2. Create Restore Points
When you make changes to a file, Windows creates backup copies of the file called snapshots. These backups are stored on your hard drive, so you can always revert to one of these snapshots if you mess up. However, creating snapshots isn’t enough to protect you from losing data. For example, let’s say you’re trying to edit a spreadsheet. As soon as you close the file, Windows deletes the snapshot. So, if you accidentally delete rows or columns, you could end up losing information.
To prevent this from happening, you need to create restore points. When you create a restore point, Windows saves a copy of the current state of your PC. Then, when you return to that point, you can easily roll back to the previous version of the document. To create a restore point, follow these steps:
Undo system changes made during Advanced startup
When you start up your computer, there are certain settings that are set automatically. These include things like turning off the display screen saver, changing the default browser, and enabling automatic updates. If you want to change those settings later, you’ll need to use the Advanced Startup Environment. This article explains how to do it.
The following steps show you how to open the Advanced Startup Environment.
1. In the left pane, double-click “System Protection.”
2. Select “Advanced Options,” and then click OK.
3. Under “Restore Point:” choose a date and time, and then click Next.
4. Choose a location where you’d like to store the backup files, and then click Next again.
How do I make automatic backups work?
To automatically backup your data every day, you must configure Windows Backup. To start configuring Windows Backup, follow these steps:
a. In the left pane, expand Local Disk (C:), right-click on Volume NTFS, and choose Properties.
b. On the General Tab, under Settings, check Automatically Back Up My Files Before Making Changes.
c. Click OK twice.
d. Restart your computer.

Tim Wiley was a tech writer for seven years at Recode. In that time, he covered everything from basic browser.js and URL parameters to XHRs, performance, malware, security, enterprise apps, social media, and Windows secrets. He also written about how to hack Signal in 2016 and how to resist, or possibly even conquer, the zero-day threat.