How to Dual Boot Windows 11 with Windows 10?
Get Your PC Ready for Windows 11
Windows 10 is here, and it’s been out for less than six months. But there are still some things you need to know about how to make sure your computer is ready for Windows 11.
Microsoft announced Windows 11 earlier this week, and while we don’t have much information about what’s coming, we do know that it will be arriving sometime next spring. In fact, according to Microsoft, “the final release date for Windows 11 is expected to be April 2018.”
But even though Windows 10 is already installed on most PCs, you might want to check whether your system is up to snuff. After all, if you’re planning on installing Windows 11, you probably won’t want to find yourself having to reinstall everything again later.
To help you prepare, we’ve put together this guide to ensure that your PC is ready for Windows 11, including instructions on how to set up a TPM chip, how to verify that your BIOS supports secure booting, and how to download the latest version of Microsoft’s PC Health Check app.
TPM Chip
If you plan on upgrading to Windows 11, you’ll likely need to purchase a motherboard with a Trusted Platform Module (TPM). This chip allows your PC to store cryptographic keys securely, preventing hackers from accessing sensitive data like passwords and credit card numbers.
The good news is that many modern motherboards come preinstalled with a TPM chip. If yours doesn’t, however, you can easily add one. You just need to buy a TPM module separately, plug it into your motherboard, and follow the steps outlined in our guide to setting up a TPM chip. Once you’ve done that, you’ll be able to use the Windows Hello feature built into Windows 10 to log into your PC without entering a password.
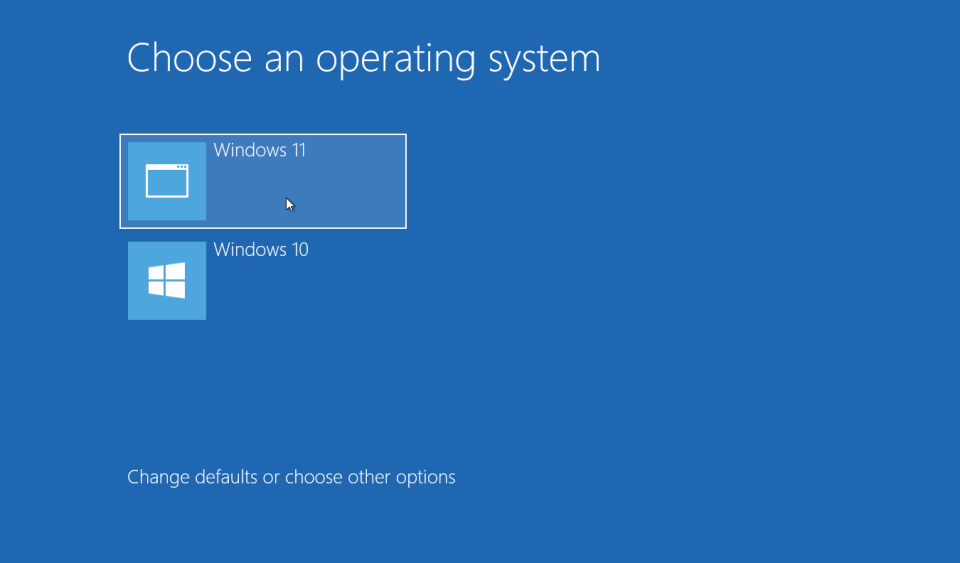
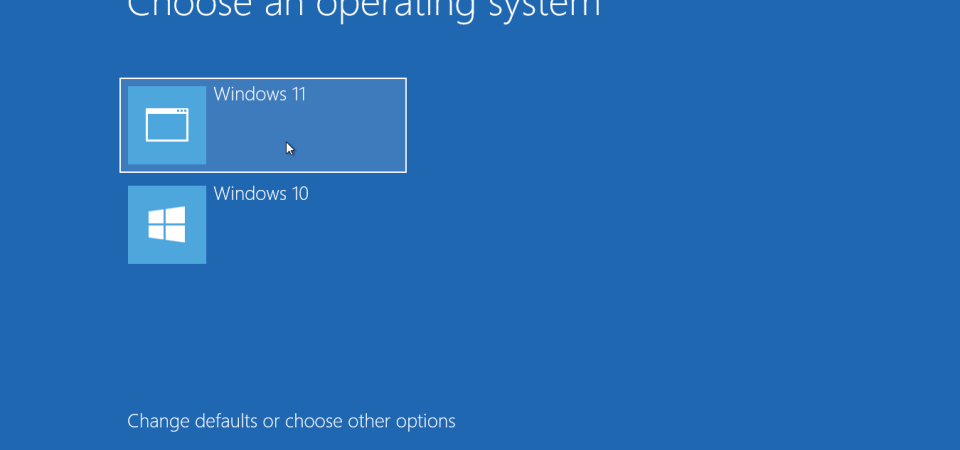
How to Run Windows 10 and Windows 11 at the Same Time
Dual booting allows you to use both Windows 10 and Windows 11 without having to uninstall one or the other. This article explains how to do it.
You’ll need two valid Windows licenses. One for Windows 10 and another for Windows 11. If you don’t already have a copy of Windows 10 installed, you’ll need a valid OEM version of Windows 10. You’ll also need a valid OEM version for Windows 11.
If you want to install Windows 11 alongside Windows 10, you’ll need a separate partition for Windows 11. You’ll need a valid Windows 11 license for this. You’ll also need to make sure that your computer meets the hardware requirements for running Windows 11.
To dual boot Windows 10 and 11, you’ll need to prepare two disks. One disk will contain Windows 10 while the second disk will contain Windows 11.
The first step is to download and install the latest release of Windows 10. Once you’ve done that, you’ll need to format the disk containing Windows 10. You’ll need to choose “Create a New Partition Table” during the installation process.
Next, you’ll need to download and install Windows 11. When you’re ready to launch the installer, select “Customize”. Then, you’ll need to tell the installer where to find Windows 10. Click “Browse My Computer”, locate the disk containing Windows 10, and select the file.
After installing Windows 11, you’ll need a way to access both Windows 10 and Windows11. For example, you could use a virtual machine like VirtualBox. Or, you could use a third party tool such as Boot Camp Assistant.
Once you’ve got everything set up, you’ll be able to start using both Windows 10 and Windows 10.
Step 1: Download Windows 11 ISO
To download Windows 11, you must have an external hard disk or a USB flash drive. If you do not have one, you can buy it online or at a local store.
If you are installing Windows 10, you can skip Step 2.
Click Next to continue.
Step 3: Select the type of installation
You can choose whether to perform a clean installation or upgrade your existing operating system.
A clean installation deletes everything on your computer and installs Windows 11 on a blank slate. An upgrade allows you to keep files and settings from your previous OS.
Select Upgrade now.
Step 2: Get ready to divide your primary Windows 10 hard drive.
In step one, we learned how to make an external hard drive. Now, let’s prepare to shrink our main drive and move some files off of it. First, you’ll want to open up Disk Management. You can do this by pressing Win+R, typing diskmgmt.msc into the Run box, and hitting Enter. If you see something like this, you’ve got the correct program installed:
Next, select the drive you’d like to shrink. Then, right-click on it and choose Shrink Volume. A window will pop up asking you what percentage of space you’d like to free up. I recommend shrinking the volume down to 50%. Once you hit OK, the process will begin. You can watch the progress bar fill up over time. When it gets close to being done, you’ll see a notification saying “Shrinking operation completed successfully.”
Now, you’ll want to copy your important files onto another drive. To do this, go ahead and plug in your external hard drive. Right-click on the folder where you’d like to store your documents and choose Copy. Go back to your original drive and paste the contents there. You can now safely delete the old shared documents folder.
Finally, you’ll want to format the drive you just shrunk. Select the drive again and right-click on it. Choose Format. From here, you can either use the default formatting options or customize the file system yourself. For example, you could change the name of the primary partition to something else, such as “Backup Drive,” or you could add a second partition to hold data specific to your needs.
Once you’re finished, you can eject the drive and unplug it. Your main drive should look like this:
You can now safely delete the backup drive.
Step 3: Reduce the Windows volume.
If you want to shrink your hard drive, there are three steps to follow. First, open Disk Management. Next, select the partition where you want to shrink it. Then, right-click the partition and choose Shrink Volume. Finally, confirm the operation by clicking Yes.
Step 4: Make a fresh volume.
A simple volume is just an empty partition without any data yet. You’ll use it to store your operating system and applications.
Shrinking a volume takes a long time and you don’t see anything happen until you reboot. To shrink a volume, you must delete everything inside the volume and start over again. This process usually takes hours, even days. If you’re planning to do this regularly, make sure you’ve backed up your important files beforehand.
When shrinking partitions, you should backup important files before proceeding. Partitions are like folders within a hard disk. They hold information about where each file lives. So deleting a partition deletes every single file inside it.
Step 5: Turn off Bitlocker encryption and fast startup
After creating a new volume, it is important to turn off Fast Startup and Bitlocker encryption. This will prevent Windows 10 from automatically encrypting files on shutdown. If you forget to do this step, you will lose access to your data.
To disable Bitlocker, open File Explorer and navigate to the folder where you store your encrypted volumes. Then select the volume name and press Shift + Enter. You will see a screen similar to the one shown above. Select “Turn off BitLocker.”
For Bitlocker, you need to disable device encryption. Open File Explorer again and navigate to the folder containing your encrypted volumes. Press Shift + Enter to open the properties window. Scroll down to Device Encryption and uncheck the box next to Enable BitLocker. Click OK to save changes.
Step 6: Your Windows 11 bootable drive to start your computer.
To create a bootable flashdrive, you will need an iso file. This is an Image of your Operating System stored on a Disk. Once you’ve booted into windows, you should Install Any Software You Want To Keep After Formating. Formatting Your Hard Drive Removes All Data From It.
Step 7: Installing Windows 11
In Step 5 we installed Ubuntu Linux onto our SSD. Now it’s time to install Windows 10. This guide assumes that you’re installing Windows 10 on a separate hard disk. If you’re installing Windows 10 alongside another operating system, please refer to the guides listed here.
The following steps are taken directly from Microsoft’s documentation. We recommend reading through the entire tutorial before starting.
1. Insert the Windows DVD into your computer.
2. When prompted, press R to start the Setup program.
3. Select Language, Keyboard, Time & Region, and then click Next.
4. On the Installation Type screen, select Customize my PC and then click Next. Note: You might be asked to insert your product key.
5. On the Product Key screen, enter your product key and then click OK.
Step 8: Dual boot Now!
Windows 10 is here, and it looks like Microsoft wants to make sure that everyone knows about it. In fact, there are several ways to upgrade to Windows 10 without having to pay $120 for the full version. Here’s how to do it.
You’ll still be able to use fast startup, but it won’t kick in every time you close the lid on your laptop.
If you want to keep using fast startup, you’ll have to manually change it. Open up Task Manager and find out what process is causing your PC to reboot. Right-click on the process name and select “Open file location,” and then navigate to %SystemRoot%\system32\config\SYSTEM. On my system, I had to open the registry editor and look for HKEY_LOCAL_MACHINE\SOFTWARE\Microsoft\Windows NT\CurrentVersion\Winlogon. Change the value named AutoAdminLogon to 0.
You can now safely turn off fast startup again. If you want to enable fast startup once again, just repeat the steps above.
Now that you’ve disabled fast startup, you can install Windows 10. Just follow the instructions on the screen. When prompted, enter a product key. Don’t worry, you can always delete the key later.
Once installed, you can either set up a dual boot or simply run Windows 10 alongside your current operating system. Type “bootrec /fixmbr” and hit Enter. Then type “bootrec /fixboot”. Finally, type “exit”, press Enter, and wait for the command prompt to return.
That’s it! Now you can enjoy Windows 10 while keeping your old OS around.

Tim Wiley was a tech writer for seven years at Recode. In that time, he covered everything from basic browser.js and URL parameters to XHRs, performance, malware, security, enterprise apps, social media, and Windows secrets. He also written about how to hack Signal in 2016 and how to resist, or possibly even conquer, the zero-day threat.