How to edit environment variables in Windows for 8, 10 & 11
There are many reasons why you might want to change the PATH and/or ENVIRONMENT VARIABLES in Windows. For example, you might want to use different versions of Python, Ruby, Java, etc., depending on what project you’re working on. Or perhaps you just want to make it easier to run multiple programs at once. Whatever reason you have, we’ve got you covered. In this tutorial, we’ll show you how to set the PATH and ENVIRONMENT variables in Windows 10.
In Windows 11, you can configure the path and variables.
To set the path and variables, press the Windows key X to open the power user task menu.
In the power user task menu, select the system option.
In the system window, scroll down to bottom and click About.
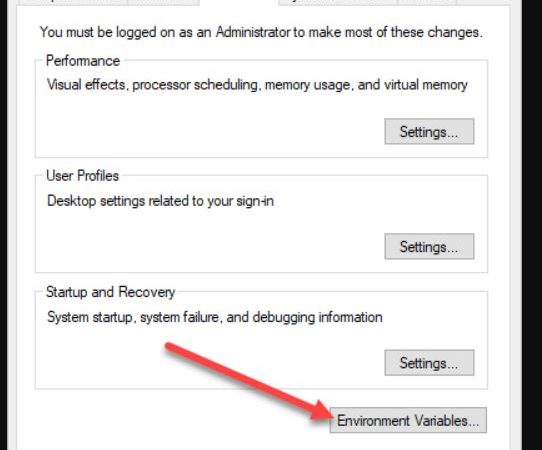
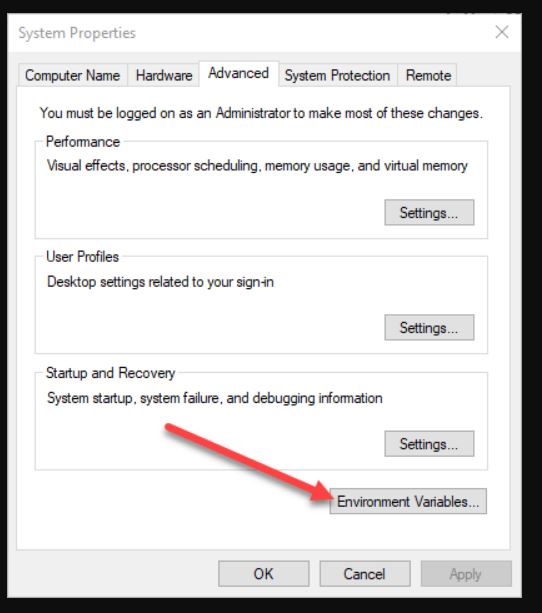
Click Advance system settings link at the end of the device specifications section.
In the system properties window, click the Advanced tab, then click environment variables button near the bottom of the tab.
In the environment variables window, highlight path variable and click edit. Add or modify the directories you want the computer to access. Each directory must be seperated with a semi colon, like this: ;C:\Program Files\MyApp;C:\Users\UserName\AppData\Roaming\MyApp
In Windows 10, you can configure the path and variables.
Press the theWindows key X to access the thePowerUserTaskMenu.In the Power User Task Menu, select the System option. In the About window, click the Advanced system settings link under Related Settings on the far-right side. Click the Advanced tab, then click the Environment Variables button near the bottom of that tab. In the Environment variable navigator, highlight the Path variable in the System variables section and click the Edit button. Add or modify the path lines with the paths you want the computer to access.
In Windows 8, you can configure the path and variables.
Press the windows key X to to open the Power User Task Menu.
Click the System option in the menu.
Select the Advanced tab.
Click the Environment Variables button near the bottom.
In the Environment Variables window select Path and click edit.
Add or modify the paths you wish to use.
Restart the computer for changes to take effect.
Path and variable configuration in Windows Vista and Windows 7
To set the path in Windows XP, go to the Start menu and select Run. Type %SystemRoot%\system32\ into the box and press Enter. Click OK. Right-click Computer and choose Properties. Select the Hardware tab. Under System Variables, click the Edit button next to Path. Add the directory where you want to store programs to the list. If you don’t know what directory contains the program you’re looking for, type “C:\Program Files\” into the textbox and hit Enter. Click Apply and Ok. Restart the computer to make sure it works.
In Windows Vista and Windows 7 there are several ways to set up the environment variables. Go to the Start menu and open the Control Panel. Click the Advanced tab. Scroll down to the Environment Variables section and click the plus sign (+). A dialog box opens. You’ll see the Current User and Local Machine sections. Expand each section and add the variable you want to change. Save the changes and restart the computer.
Path and variable configuration in Windows 2000 and Windows XP
In order to set the path for programs and other settings, you must edit the system properties in Windows 2000 and WindowsXP. This article explains how to do it. To start, open up the Control Panel and select System and Maintenance. Click on the System icon to view the System Properties dialog box. Then, click on the Advanced button.
The Advanced dialog box opens. Scroll down to the Environment Variables section and click on Edit… to bring up the System Properties dialog box again. Select the Path variable and press OK. Now, scroll down to the User Variable section and click on Edit…. Again, select the Path variable and press Ok.
Now, repeat steps 2 and 3 above to modify the other variables. Once done, close out both windows.
What is the standard Windows%PATH%?
There is no “default path”. Your %PATH% value changes whenever you install new programs. If you want to know what it is now, type “%path” into the Command Prompt window. You’ll see something like this:
C:\Users\YourUserName\AppData\Local\Programs\Microsoft VS Code\bin;C:\Users\Your User Name\AppData\Roaming\npm;C:\Users\YOurUserName\AppData\Roaming\Microsoft\WindowsApps;C:\Users\yourusername\AppData\Local\Microsoft\WindowsApps
You can add paths to this list manually by typing each directory name separately. For example, if you wanted to add the path to Visual Studio Code, you’d type:
This will open up the configuration file for Visual Studio Code. Search for the word “executable”, and you’ll find the location of your application.
Path configuration in MS-DOS and Windows command lines
In Windows, the PATH environment variable contains directories where programs are installed. This allows applications to find each other easily. If you use multiple operating systems, it is important to set the same PATH variable across platforms. Otherwise, you might encounter errors while running commands such as “java -version” or “git status”. To make sure you don’t forget about setting the PATH variable, Microsoft added a feature called “Windows Subsystem for Linux” (WSL). WSL lets you run Linux apps directly within Windows. You can even install Linux distributions like Ubuntu or Fedora. But there is one problem: WSL doesn’t work properly with the PATH variable. So how do you fix it?
The PATH variable is configured automatically in Windows 10. However, for older versions of Windows, you need to modify the PATH variable yourself. There are several ways to do this. One way is to open up the registry editor and change the values of HKEY_LOCAL_MACHINE\SOFTWARE\Microsoft\Command Processor. Another option is to edit the PATH variable manually using the SETX command. Here’s what it looks like:
setx PATH “C:\Users\username\.nuget\packages\;C:\Program Files (x86)\Common Files\microsoft shared\DevServer\10.0\bin\Servicemodelbuilder.exe;”c:\program files\dotnet\sdk\NuGetFallbackFolder\tools\
What is the distinction between “Help Center” and “Documentation”?
The Help Center provides information about how to use the software while the Documentation contains detailed instructions on how to install, configure and customize it.
How do I report bugs or problems?
You can submit bug reports and feature requests directly from within the Help Center. You can also send an email to
Can I leave feedback in the documentation?
Yes, we encourage everyone to participate in discussions and ask questions in the forums. We also welcome feedback and suggestions in the issue tracker.

Tim Wiley was a tech writer for seven years at Recode. In that time, he covered everything from basic browser.js and URL parameters to XHRs, performance, malware, security, enterprise apps, social media, and Windows secrets. He also written about how to hack Signal in 2016 and how to resist, or possibly even conquer, the zero-day threat.