How to Fix High CPU and Disk Usage by utcsvc
The UTCSVC process uses up a lot of resources on my computer. I’ve tried many things to stop it including disabling startup programs, deleting temp files, etc. However, nothing seems to work. Is there anything else I can do to stop this process?
I found out what caused this problem. My antivirus program had detected some suspicious activity and blocked access to certain sites. After unblocking those sites, the problem went away.
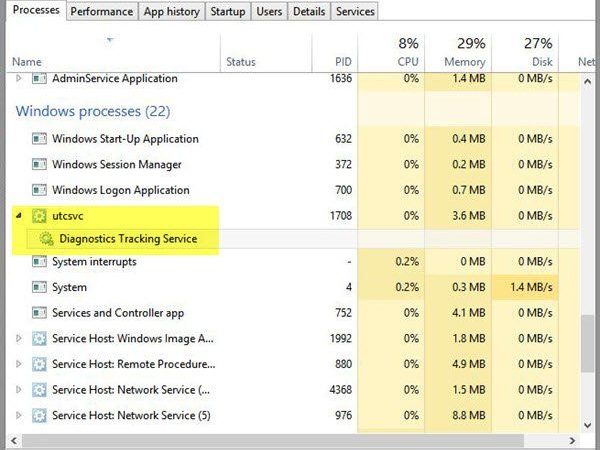
High CPU and Disk usage by UTCSVC
UTC Service collects system metrics and sends them to Microsoft. This includes things like CPU utilization, disk space used, memory consumption, etc. If you are experiencing issues with high CPU/disk usage, disable the service. Scroll down to find “Microsoft Windows Time Synchronization Utility”. Right-click on the service name and select Properties. On the General tab, uncheck the box next to “Startup type.” Click OK. Restart your PC.
What exactly is svchost.exe?
Svchost.exe is one of many processes running in Windows. It’s a very important process because it handles all the services in Windows. However, it can use up a lot of resources, especially if you run multiple applications simultaneously. If this happens, it could slow down your computer and even crash some programs.
The name of this process is actually netsvcs.exe. You can find out what it does by opening Task Manager. Click Processes tab and select svchost.exe. Then press Ctrl+Shift+Esc keys to open System Information window. Scroll down to see detailed information about this process.
Is svchost.exe (netsvcs) a virus?
Svchost.exe is one of those processes you never really think about unless something goes wrong. But it’s actually a very important part of Windows that helps keep everything running smoothly. And while it doesn’t do anything malicious, it does allow malware to run without being detected. In fact, some malware uses svchost.exe as a way to hide itself. So what exactly is svchost.exe? Let’s take a look.
What Is Svchost.exe?
svchost.exe is just another name for netsvcs. This is a normal process that’s used to manage network connections on Windows systems. When you start up your computer, it starts up netsvcs automatically. You don’t even notice it because it’s always there. However, it’s not like every single program needs access to the internet. For example, antivirus software won’t work properly if it can’t connect to the internet. So, when you turn off your computer, the connection manager shuts down too.
But sometimes, you might want to manually shut down the connection manager. Maybe you’re troubleshooting a problem and want to see how things are working behind the scenes. Or maybe you’ve got a firewall installed and you want to temporarily disable it. Either way, you can open netsvcs with the command prompt.
How Does Svchost.exe Work?
When you open netsvcs, you’ll see a list of active networks. Each network represents a different type of connection. If you select a specific network, you can view detailed information about it. For example, you could check out the IP address, port number, and MAC address associated with each network.
You can also set a specific network as default. By doing this, you’ll make sure that all future connections go through that particular network. This makes sense if you’re trying to connect to a VPN server, for example.
How to turn off utcsvc.exe
To disable the Connected User Experience & Telemetry service, you must open the Service Manager and find the service named “Connected User Experiences & telemetry”. Rightclick on it and choose Properties. Select the Startup Type tab and set it to Disabled. Apply and Ok.
2] Disable Connected User Experience & Telemetry Service using Registry Editor
To disable connected user experience and the telemetry service, we need to make changes to the Windows Registry. This article explains how to do it.
3] Disable Connected User Experience & Telemetry Service using Group Policy Editor
Microsoft has introduced several changes to Windows 10 over the past few months. One of those changes includes disabling the “Connected User Experience.” While it might sound like a good thing, there are some drawbacks to disabling this feature. In fact, Microsoft has already disabled this setting in the latest Insider builds of Windows 10. However, if you want to disable this setting manually, you’ll need to use the Group Policy Editor.
In this tutorial, we’re going to show you how to do just that. We’ll start off by showing you how to enable this setting in the first place. Then, we’ll walk you through the steps needed to disable it. Finally, we’ll explain why you might want to turn this option off.
How to Enable/Disable Connected User Experience
To begin, open up the Group Policy Editor. You can do this by opening the Start menu and typing “gpedit.msc,” or pressing Win+R and entering “gpupdate /force.” Once the Group Policy Editor opens, navigate to Computer Configuration\Administrative Templates\Windows Components\User Account Control\System Services\XboxLiveService.
Once you’ve opened the System Services window, double-click on the Xbox Live Service entry. A dialog box will pop up asking whether or not you’d like to enable or disable this service. Select “Enable” to allow the Xbox Live Service to run. If you select “Disabled,” the Xbox Live Service won’t work.

Tim Wiley was a tech writer for seven years at Recode. In that time, he covered everything from basic browser.js and URL parameters to XHRs, performance, malware, security, enterprise apps, social media, and Windows secrets. He also written about how to hack Signal in 2016 and how to resist, or possibly even conquer, the zero-day threat.