How to set up a VPN Connection in Windows 10 (Step-By-Step)
A VPN connection is useful for protecting yourself online. You can use it to secure your Internet connection and keep others from snooping on your activity. In addition, you can use a VPN connection to access your computer remotely.
In this article, we’ll show you how to set up a VPN connection on Windows 10. We’ll start with step-by-step instructions for setting up a VPN connection on a desktop computer running Windows 7 or 8.1. Then, we’ll cover how to configure a VPN connection on a laptop or tablet running Windows 10.
Before you begin, make sure you’ve got everything ready. First, download and install the software. Next, turn off your firewall and antivirus programs. Finally, ensure that your router supports UPnP/NAT traversal. If you’re unsure about what those terms mean, check out our guide to understanding NAT and UPnP.
Now, let’s take a look at each step.
STEP 1: Configure Your Router
The first thing you need to do is configure your router. To do this, open the Network & Sharing Center. Click Change adapter settings under Network and Sharing Center. Select the Local Area Connection icon. On the next screen, select Properties.
On the General tab, enter your IP address into the Address box. Enter the subnet mask into the Subnet Mask box. Leave the Default Gateway blank. Choose Automatic Metric from the Type drop-down list. Check Enable DHCP. Under DNS Servers, choose Manual. Scroll down to the bottom of the window and uncheck Automatically detect settings. Click OK.
How to Add and Connect to a VPN Manually in Windows 10
To set up a VPN manually on Windows 10, follow these steps. Then, select “VPN settings.” Next, scroll down to find the option to “Add a VPN profile.” Click on it. You’ll see a list of VPN providers. Select one, enter the server address, username, password, and encryption type. Finally, tap “Connect.” Now, you’re ready to go.
Your VPN provider should offer a method to manually connect to its server. If you don’t know how to do this, check out our guide on how to manually connect to a VPN on Android.
If you want to use a VPN without having to remember to turn it off every time you log into your computer, you can automate the process. Here are some tips on how to do this.
First, download and install the software. Open the program, and click “Create New Profile.” Enter the name of your choice, and choose whether you’d like to automatically start the VPN when you boot your PC. Tap “Next,” and then “Finish.”
Now, whenever you reboot your PC, the VPN will automatically connect. When you close the app, the VPN will stop working. So make sure to save your work before closing the application.
You can also configure your VPN to automatically connect when you sign into your Microsoft Account. This works best if you already have a Microsoft Account. Go to the “Accounts” section of the VPN app, and then click “Sign in.” Choose “Microsoft Account” under “Choose what accounts to link to my VPN.”
Finally, if you’re worried about accidentally logging onto a public Wi-Fi hotspot while connected to a VPN, you can disable automatic connections. Just go to the “Settings” tab, and uncheck the box next to “Automatically connect to VPN when I’m near a secure network.”
How to Disconnect and Remove a VPaN Connection from Windows 10
If you want to remove it permanently, follow these steps:
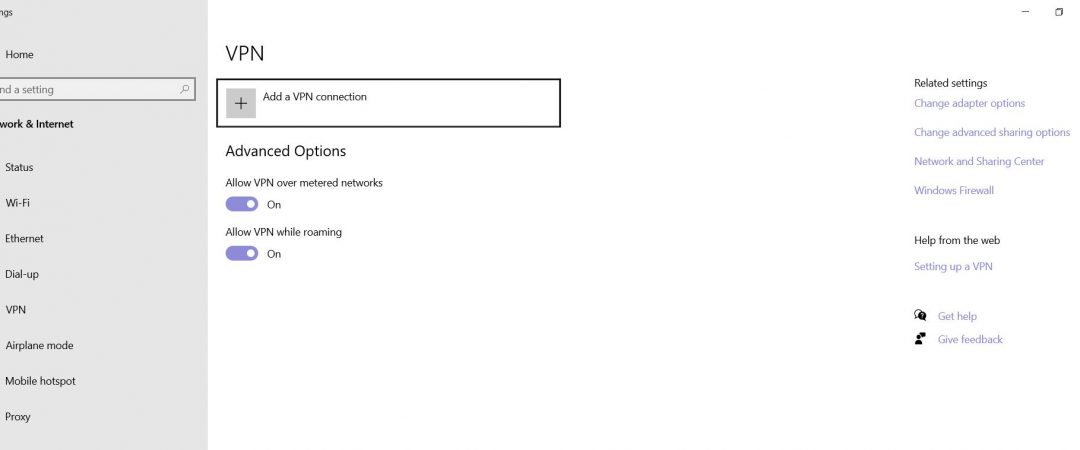
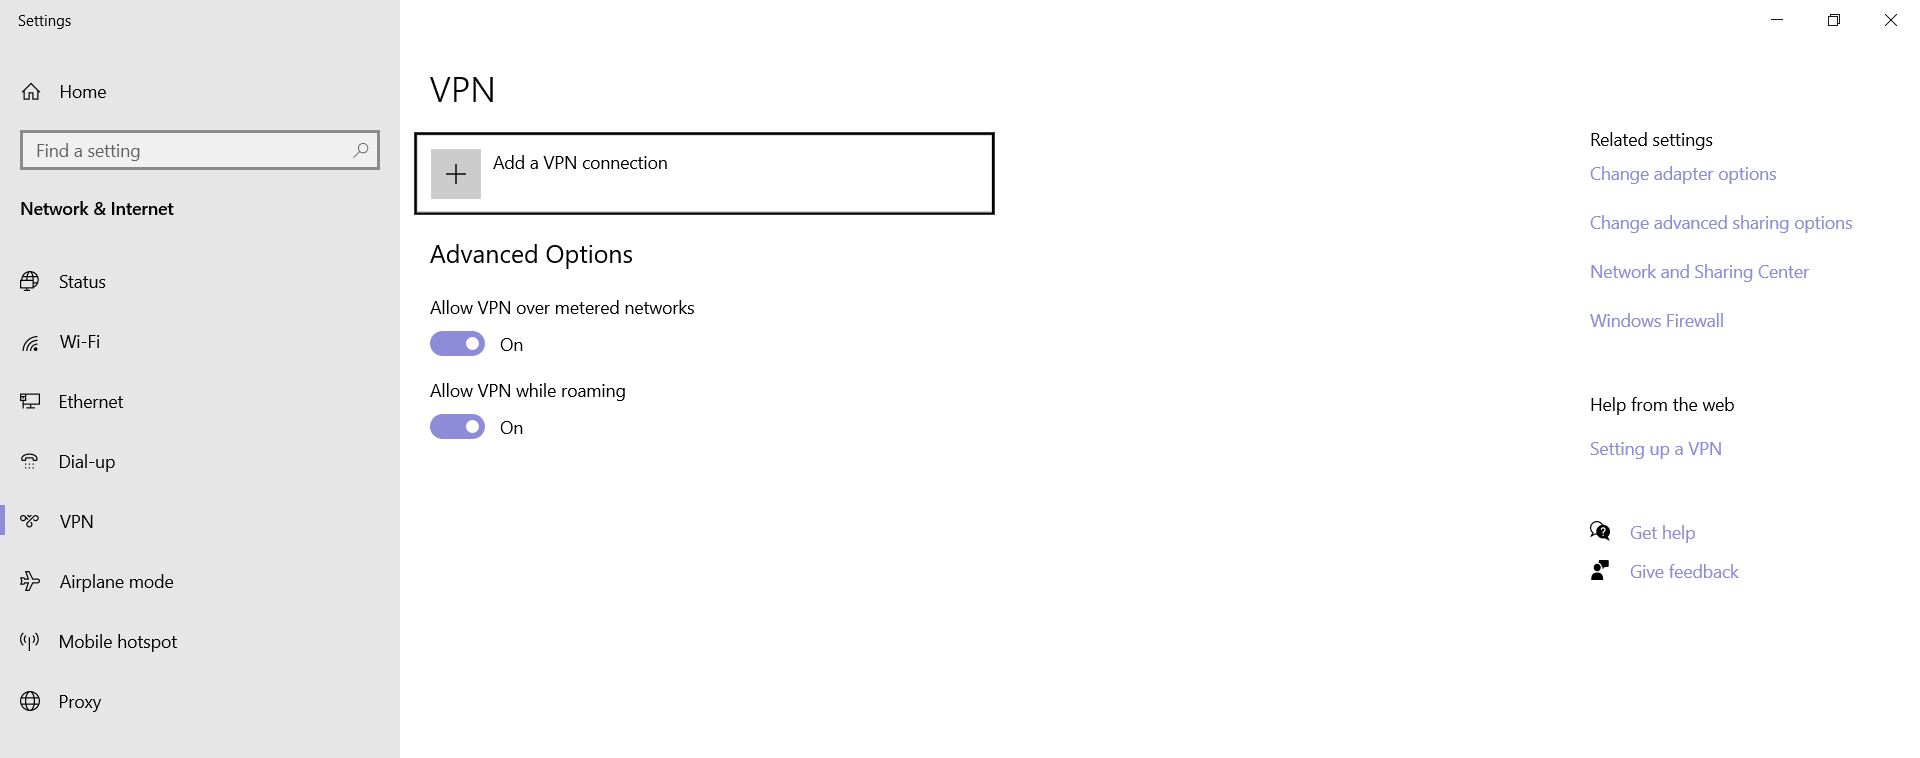
1. Click Advanced options
2. Scroll down and find the VPN connection you wish to delete.
3. Uncheck Connect Automatically
4. Press OK
5. Repeat step 4 for each VPN connection you wish to remove
6. Reboot your PC
7. Enjoy your newly unsecured internet experience
Step 1: Obtain the Correct Login Information
To create a VPN account, it helps to know what information you’ll need to provide. Here are some things you’ll want to keep in mind:
1. Your email address. This is where you’ll receive notifications about your account. You won’t be able to access your account without one.
2. Your username. This is how you log into your account.
3. Your password. Make sure you use a strong password that includes letters, numbers, and symbols.
4. Your payment method. If you pay via credit card, make sure you select “Payment Method – Credit Card.”
5. Your billing address. This is where your monthly subscription fee goes.
6. Your server location. Choose a location based on where you live. For example, if you live in New York City, choose “New York City.”
Step 2: In Windows, navigate to VPN Settings.
In order to connect to a virtual private network (VPN), you will need to know it’s IP address. You can use one of several methods to find out what your IP address is. Here’s how to do it in Windows 10.
1. 2. Type “ipconfig /all”. Press Enter.
3. Look for something like “IPv4 Address.” This is your public IP address.
4. Type your IP address into the box and hit enter.
5. Copy the text that appears under “Your Public IP Address.”
6. Paste that number into the field labeled “Connect To Your VPN Server.”
Step 3: Configuring a VPN Connection
A VPN connection lets you securely access a network over the Internet. You can use it to protect your privacy while browsing the web and accessing sensitive data.
To set up a VPN connection, follow these steps:
1. Open Network & Sharing Center.
2. Click Change Adapter Settings.
3. Right-click the adapter name listed there and select Properties.
4. In the General tab, choose Automatic (VPN).
5. If you’re prompted for credentials, enter them now.
Step 4: Configuring the VPN Server
Once you have selected the VPN server you wish to connect to, tap the green button. You will see a message stating “Connected to.” This indicates that you are securely connected to the internet via the VPN server.
Advanced Settings
VPN connections are great because they allow you to access blocked sites like Facebook and Twitter. However, there are some things you need to do to make sure everything works properly. Here are three tips to help you set up a VPN connection correctly.
1. Choose a VPN provider
There are many providers out there, but it’s important to choose one that offers good customer support. You’ll want to find a provider that lets you use multiple devices simultaneously, and that doesn’t require too much technical knowledge. If you don’t feel comfortable configuring a VPN connection yourself, consider getting a subscription package that includes setup assistance.
2. Set up your device
If you already have a router, you probably already have a way to connect to the internet. Make sure you’ve got a strong Wi-Fi signal and that your computer isn’t running slow. Then open a web browser and go to the VPN provider’s site. Click “Create Account,” enter your email address and password, and follow the instructions.
3. Connect to your VPN
Once you’ve signed into your account, you’ll see a list of servers. Pick one near where you live, and then select “Connect.” Your device will now be able to browse the internet securely.
Windows 10 VPN Software
Using a VPN on Windows is pretty simple. You just need to download one of the many free VPN apps available online. But there are some things you should know about how it works.
First, what does a VPN do? A virtual private network allows you to connect to the internet via another computer. This way, your traffic passes through a secure tunnel rather than directly over the public internet.
Second, why might you want to use a VPN? There are several reasons. For example, you could use a VPN to access blocked sites like Facebook or YouTube. Or maybe you’re worried about government surveillance. In either case, you’ll need to make sure that your VPN provider isn’t logging your data.
Finally, how do I set up my VPN? If you’re running Windows 10, you don’t need to install anything special. Then scroll down to “Use a VPN connection.” Here, you’ll see three options: “Connect automatically,” “Allow apps to connect,” and “Turn off automatic connections.” Choose whichever option best suits your needs.
Using VPN software to set up a VPN on Windows: a step-by-step guide
VPN stands for Virtual Private Network. It lets you access the internet privately, without anyone knowing what sites you are accessing. You can use a VPN to protect yourself online, especially if you’re worried about government surveillance. In this article we’ll show you how to set up a VPN on Windows 10. We’ll walk you through the process step-by-step.
Step 1: Choose a VPN provider
There are many different types of VPN providers out there. Some offer free accounts while others charge monthly fees. If you want to keep things simple, choose one that offers a free trial period.
We recommend NordVPN because it’s easy to use, reliable, and secure. You can try it for 30 days for free. After the trial period ends, you pay $6 per month.
Step 2: Install the VPN software
Why Should You Use a VPN on Windows 10?
A VPN protects your data and allows you to access blocked sites. You can use it to connect to a secure server located somewhere else in the world. This way, you can browse the web privately and securely.
There are many different types of VPNs available. Some are free while others cost money. Before choosing one, make sure it meets your needs. Here are some things to consider:
1. Does the VPN respect your privacy?
2. Is the provider trustworthy?
3. How easy is it to set up?
4. What features does it offer?
5. Are there any restrictions?
How do I connect to a VPN on Windows?
There are many different VPN services out there, each offering its own unique features. Some offer unlimited bandwidth while others limit it to a certain amount per month. Some let you choose how much data you want to use, while others charge based on usage. And some allow you to connect to servers around the globe, while others restrict where you can go.
With a VPN service, you don’t just connect to one location; you connect to multiple locations simultaneously. This way, even if someone blocks access to a specific site, you’ll still be able to reach it via another server. You can also encrypt your traffic, ensuring that no one else can see what you’re doing online.
If you’re looking for a free VPN solution, we recommend Private Internet Access. They offer unlimited bandwidth and support over 150 countries. If you’d like something more robust, consider CyberGhost. Their service offers unlimited bandwidth and supports over 200 countries. Or, if you prefer a paid option, try ExpressVPN. They offer unlimited bandwidth, plus they provide additional features such as split tunnelling and DNS leak protection.
What are the benefits of using a VPN on Windows?
A VPN gives you an extra level of privacy when browsing the internet. You can use one to make sure that no one snoops around what you’re doing online. This includes hackers trying to steal your personal information, government agencies looking into your activities, and even ISPs tracking your activity.
Using a VPN makes it easier for you to connect to certain WiFi networks. If you want to access public WiFi hotspots, such as those at coffee shops, airports, hotels, etc., you’ll need a VPN.
Finally, a VPN lets you browse the internet anonymously. There are many reasons why people might want to do this. For example, some people feel uncomfortable about being tracked online. Others don’t like how easily their IP address can be traced. Still others just want to keep their identity hidden.
What is the best VPN for Windows?
There are many different VPN services available online, but which one is the best? We’ve rounded up five of the most popular options and compared them side-by-side to help you decide what works best for you.
1. Private Internet Access
Private Internet Access (PIA) is a fast and reliable VPN service that provides unlimited bandwidth and servers across the globe. PIA offers three plans: Basic ($6/month), Plus ($12/month), and Premium ($24/month). All plans include unlimited data transfers, 24/7 customer support, and 30 days money back guarantee.
2. ExpressVPN
ExpressVPN is another great option for those looking for a simple, easy-to-use VPN solution. With ExpressVPN, you’ll get access to over 300 server locations worldwide, including the US, UK, Canada, Australia, New Zealand, Netherlands, Germany, France, Spain, Sweden, Switzerland, Japan, Singapore, Hong Kong, South Korea, Taiwan, Mexico, and Brazil. You can choose from three subscription packages: 3-, 7-, and 12-months.
3. NordVPN
NordVPN is a powerful VPN service that gives you access to over 4000 servers in 90+ countries around the world. This includes the United States, UK, Canada, Ireland, Belgium, Denmark, Finland, Iceland, Luxembourg, Norway, Portugal, Romania, Slovakia, Slovenia, Spain, Sweden, Turkey, Italy, Greece, Cyprus, Malta, Liechtenstein, Monaco, San Marino, Andorra, Austria, Croatia, Czech Republic, Hungary, Latvia, Lithuania, Poland, Estonia, Slovakia, Bulgaria, Moldova, Macedonia, Montenegro, Serbia, Albania, Bosnia & Herzegovina, Kosovo, Gibraltar, Mauritius, Antigua & Barbuda, Anguilla, Bermuda, British Virgin Islands, Cayman Islands, Dominica, Montserrat, Guernsey, Jersey, Turks & Caicos Islands, Isle Of Man, Aruba, Bahamas, Barbados, Belize, Brunei Darussalam, Bolivia, Chile, Costa Rica, El Salvador, Guatemala, Honduras, Jamaica, Martinique, Nicaragua, Panama, Paraguay, Peru, Saint Kitts & Nevis, Saint Lucia, Saint Vincent & Grenadines, Samoa, Suriname, Trinidad & Tobago, Uruguay, Venezuela, Vanuatu, and Vatican City.

Tim Wiley was a tech writer for seven years at Recode. In that time, he covered everything from basic browser.js and URL parameters to XHRs, performance, malware, security, enterprise apps, social media, and Windows secrets. He also written about how to hack Signal in 2016 and how to resist, or possibly even conquer, the zero-day threat.