Adjust Brightness after Upgrading to Windows : A Guide
Change the brightness of the screen
To change the brightness, contrast, or sharpness of a picture, open the Picture menu, and choose Adjust image size, which is located under the More Options button. You’ll see three different options for adjusting photos: Brightness, Contrast and Sharpness.
Make changes to the brightness, sharpness, or contrast.
When it comes to PowerPoint presentations, there are many things that can make or break a slide show. One thing that often gets overlooked is adjusting the brightness, sharpness and contrast settings. These three simple steps can really improve the look and feel of your next presentation.
To adjust the brightness, shareness or contrast, click Picture Corrections Option, and then select one of the following options: Brightness, Sharpness, Contrast.
Click Save As to save the adjustment to the original file. You can always go back and undo the change. If you don’t like the way the picture looks, simply repeat the process.
What is Windows 10’s maximum brightness?
Windows 10 has been out for a little over a week now, but I’m still finding myself asking questions like “what is the maximum brightness?”
I’ve seen some pretty bright screens before, but nothing quite like my friend’s Dell XPS 15 9570 laptop screen. When he first showed me his laptop, I was blown away by its brightness. He told me that the display is capable of reaching 1000 nits.
That’s right – 1,000 nits! And it’s true. My eyes were burning after just a short period of time looking at the screen.
So what does 1000 nits mean? Well, it basically means that the screen is so bright that it appears white when viewed under direct sunlight. So, if you’re sitting outside during the day, you’ll probably find yourself squinting to read text on the screen. But if you’re inside, you won’t have to squint at all.
But wait…there’s more. According to Microsoft, the screen also supports HDR content. What’s HDR? Well, it stands for High Dynamic Range. Basically, it allows the screen to produce brighter whites and deeper blacks.
So, if you’re reading this article outdoors, you may notice that the colors look slightly different than usual. That’s because the screen uses HDR technology to make sure that everything on the page is visible.
And finally, the screen is also compatible with Dolby Vision. Dolby Vision is another type of HDR technology that makes color richer and more vivid.
So, if your next Windows 10 PC is equipped with a high-quality screen, you’ll enjoy watching videos, playing games, browsing the web, and doing anything else that requires a lot of light.
Change the brightness or contrast of a photograph.
Click the picture that you want. You can adjust the brightness or the contrast of pictures without changing the actual size.
If you don’t like the effect, just press Ctrl + Z to undo it.
(The tool works best on images with solid colors.)
Image sharpness can be adjusted.
Sharpness refers to how much detail you see in the image. If something is blurry, there isn’t enough contrast between light and dark areas. This causes the edges of objects to blend together into one color. Sharpening helps make things look clearer and crisper.
There are many different ways to sharpen images, including adjusting the amount of sharpening applied to each part of the image. You can use software like Photoshop or GIMP to do this. Or, you can use a free online tool called Unsharp Mask.
The following video demonstrates how to apply unsharp masking to a photo.
To improve contrast, change the Office color scheme.
In Windows 10, there are several ways to change the brightness and contrast of images. First, you can use the built-in Photo Viewer app to make adjustments. Then, you can adjust the brightness and contrast levels.
You can also do some basic editing directly in Microsoft Word 2016. Now, you can drag the slider to increase or decrease the contrast level.
Finally, you can also use the Control Panel to adjust the brightness and/or contrast of photos. Start by opening the Control Panel, selecting Devices and Printers, and clicking Change PC Settings. Next, scroll down to Display and Colors, and select Set Up Your Computer. Finally, adjust the brightness and contrast.
Picture brightness can be adjusted.
Click the Picture Tools button to open the Adjust tab. There are several ways to change the brightness of a photo. You can use the slider tool, or you can choose one of the presets under the Formats group. If you don’t see the formatter you’re looking for, try clicking the More Options link.
The Brightness setting lets you control how bright or dark the image appears. When you increase the amount of light coming into the camera, it makes everything brighter. Conversely, decreasing the amount of light decreases the overall brightness.
To make things easier, here’s a quick tip: Hold down the OK button while moving the slider. This allows you to quickly move the slider up or down without having to press the buttons.
You can also use the sliders to manually set the brightness levels. For example, if you know that you’ll be shooting outside during daylight hours, you might want to turn off the automatic exposure mode and set the ISO speed to 200 or 400. Then, you can dial in the correct shutter speed and aperture settings based on the lighting conditions.
Picture contrast can be adjusted.
Click the picture that you want to adjust the contrast for. Then under Picture tools, select adjustments, and then contrast. To finetune the contrasts, click Picture corrections options, and then drag one of the sliders.
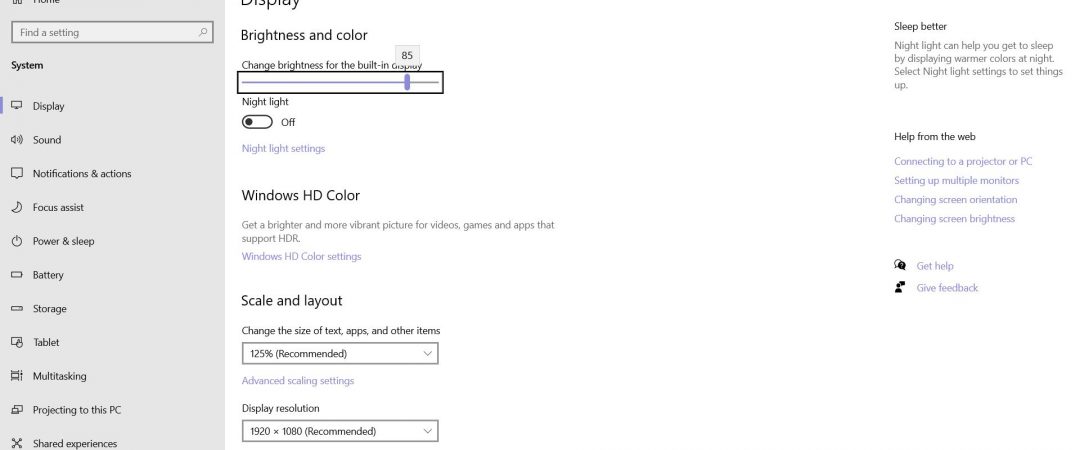
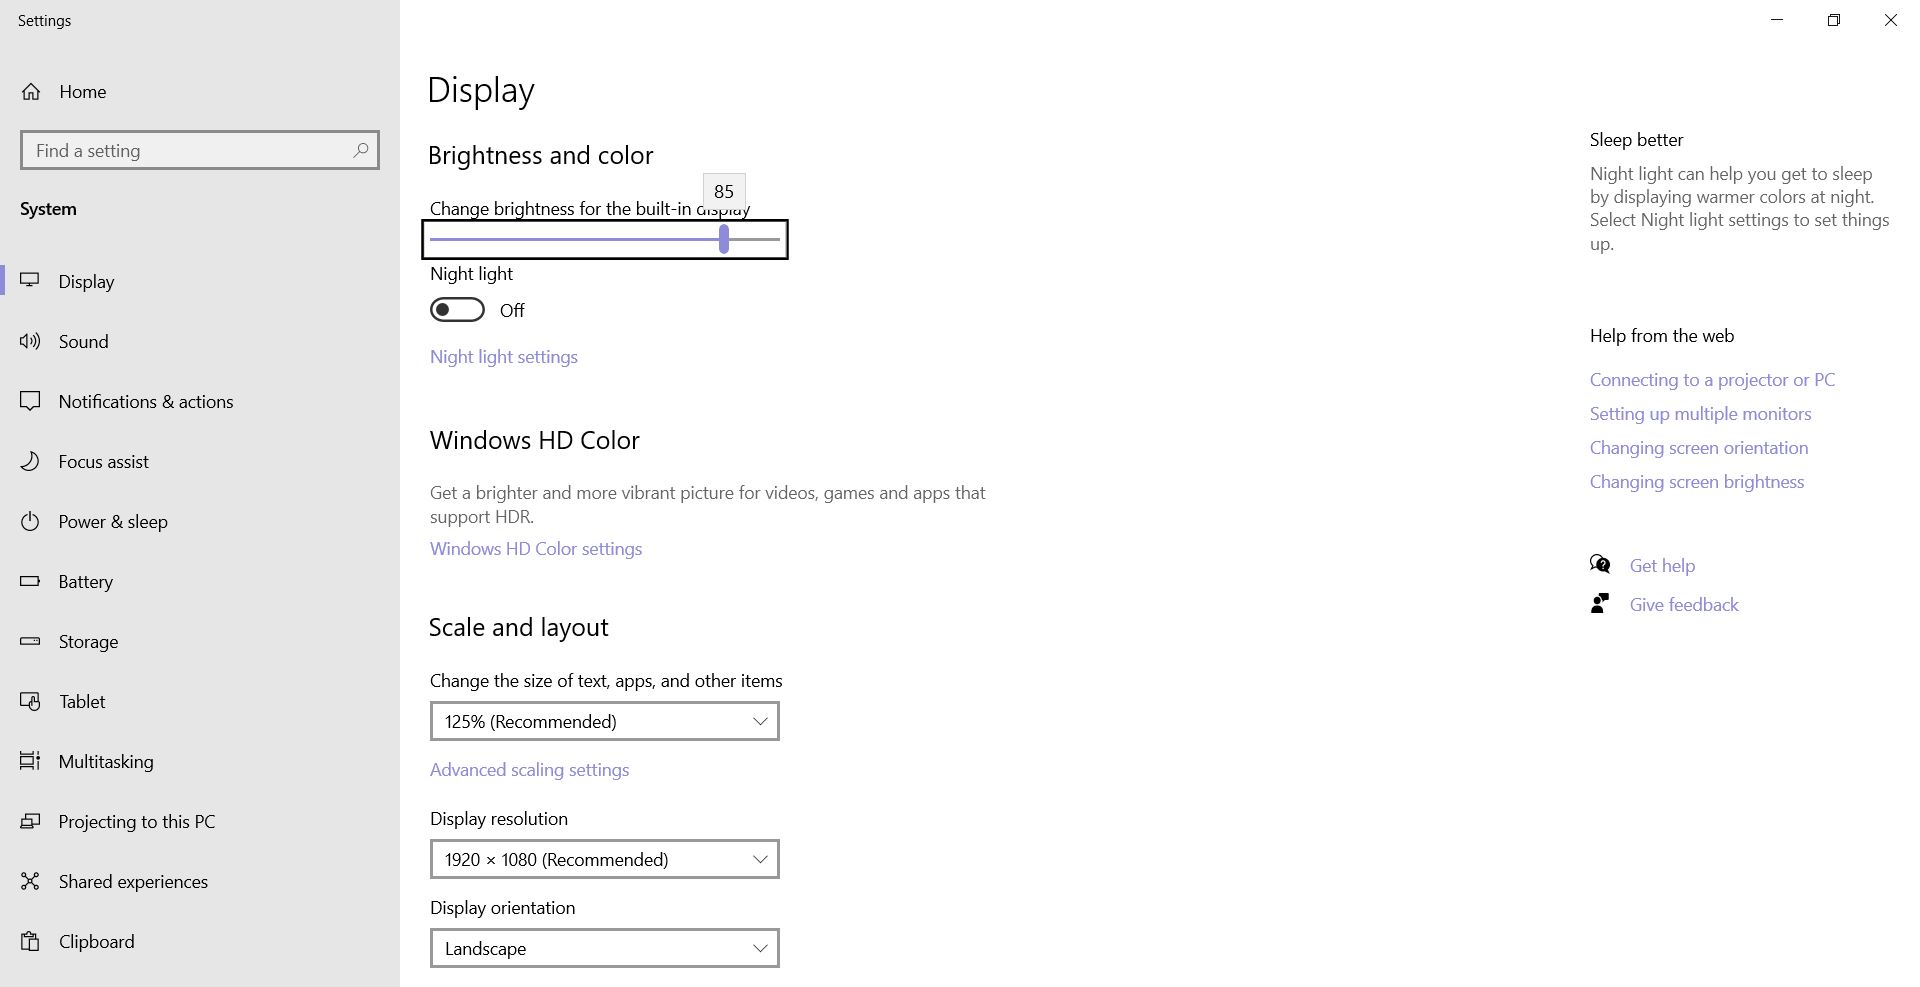
Is there a night light option in windows 10
Nightlight is a feature introduced in Windows 10 that allows users to turn on a dimmed display screen when going to sleep.
It was first introduced in Windows 8.1 Update 1 but now it is also present in Windows 10.
You can choose between On/Off mode.
Once enabled, you can adjust brightness level by sliding left and right.
Also, you can set the color temperature of the night light by clicking on Color Temperature button.
Click here to read more details about Night Light Feature in Windows 10.

Tim Wiley was a tech writer for seven years at Recode. In that time, he covered everything from basic browser.js and URL parameters to XHRs, performance, malware, security, enterprise apps, social media, and Windows secrets. He also written about how to hack Signal in 2016 and how to resist, or possibly even conquer, the zero-day threat.