High CPU Usage by Service Host: Local System (Network Restricted)
This article describes how to fix high CPU usage by service host: local system (network restricted). If you are experiencing high CPU usage by service hosts: local system (network restriction), it could be caused by one or more of the following reasons:
1. There is an antivirus program installed on your computer. Disabling the antivirus software might help reduce the CPU load.
2. You are sharing files over a network. Try disconnecting the shared folder(s) and restarting your computer.
3. Your computer is configured to use a proxy server. Disable the proxy settings on your browser and reboot your computer.
4. You are connecting to a remote desktop session. Make sure that the Remote Desktop Services service is enabled and start the Remote Desktop Session Host service.
5. You are trying to connect to a network share. Check whether the network shares are properly set up.
6. You are using a printer driver that does not support printing directly from Windows Explorer.

What is a Service Host Local System?
Service Host Local System is a component of Windows 10 that runs automatically. This component is used to update Windows 10 devices. If you use Microsoft Edge, Internet Explorer 11, Chrome, Firefox, Opera or Safari browsers, you must turn off the Service Host Local System. Otherwise, you might experience high CPU, memory and hard disk space consumption.
The following steps show how to turn off the Service Host local system.
1. Open Settings app.
2. Click More info.
3. Scroll down to Services & Apps.
4. Select Turn Off All Automatic Updates.
5. Restart your computer.
6. Check whether the problem still exists.
If you want to know more information about the Service Host Local System, please refer to the article “How to stop the Service Host Local System.”
What can I do about Service Host using a lot of CPU?
If you are facing issues with Service Host causing high CPU usage, it could be due to one of the following reasons:
1. There might be some malware installed on your computer. You can use Malwarebytes Anti-Malware to scan your system and remove any threats.
2. Your Internet connection might be unstable. Check your router’s status and make sure it is working properly.
3. There might be a hardware failure. Try connecting another USB port or restarting your PC.
4. Some applications might be misbehaving. Disable unnecessary programs and see if the issue persists.
5. A third party application might be causing the issue. In such cases, uninstall the app and reinstall it again.
6. You might have set up a proxy server.
1. Turn off the Superfetch Service and the Background Intelligent Transfer Service.
Superfetch and BITS are both Windows Services that run automatically whenever you boot up your computer. They’re designed to speed up your start-up process by preloading files into RAM. However, it turns out that they can cause problems for some people. If you’ve been experiencing slow startup times recently, there’s a good chance that one or both of these services are causing issues. To disable them, follow these steps:
Step 2 – Scroll down to “Microsoft Office SharePoint Server 2010 Products”. Right-click on the entry and select Properties.
Step 3 – Click on Startup Type and change it to Disabled.
Step 4 – Click OK twice to close the properties window.
Step 5 – Restart your PC. You’ll notice that the services no longer run during the boot process.
2. Stop the memory leak in the Non-Paged Pool of Memory.
This article explains how to solve memory leak problems in Windows 7. If you are experiencing frequent crashes, freezes, slow performance, etc., it could be due to a memory leak problem. To resolve this issue, we recommend that you follow the steps described in this article.
3. Checking the system files
The Windows 10 operating system includes a built-in tool called the System File Checker (sfc). This tool scans your computer for missing, corrupt, damaged, or obsolete files. You might see a prompt asking you to confirm whether you want to run sfc /scanno automatically. If you accept the prompt, it runs automatically every 30 days. However, if you don’t accept the prompt, you must manually run sfc /scanni each time you start up your PC.
If you are experiencing issues with your Windows installation, such as slow performance, freezing, crashes, or blue screens, you should run sfc /scanna. This scan checks for problems with the following components:
• Registry
• Boot configuration
• Startup items
• Drivers
• Services
4. Taking out SVChost
If you are experiencing issues updating your PC, it could be due to the fact that there is still some software running in the background. This software is called the “Service Host”, and it is responsible for keeping track of all the programs that run on your computer. If you want to stop this program from running, you must open up the task manager and find the Svchost.exe file. Once you locate it, simply press CTRL + ALT + DEL to bring up the task manager. Then, select the Processes tab and look for the Svchost. You’ll see a list of processes that start with svchost.exe. Click on each one to view the information about that particular process. Look for the name of the process that says “svchost.exe”. Right-click on it and choose End Process. Now, go ahead and restart your computer.
5. Getting a fresh start
To clean boot your system, go to the start menu and type “msconfig”.
Open up the System Configuration utility.
Click on the Services tab.
Select each service that starts automatically during Windows startup.
Disable those services that are not needed.
If you want to keep some services enabled, make sure that they do not start automatically during startup.
You can use the following steps to find out what services start automatically during Windows startup. Right-click on My Computer and choose Properties. In the left pane, click on Advanced System Settings. Under Performance Options, click on the Startup Tab. You’ll see a list of services that start automatically during Windows startup, along with their status. If you don’t see any services there, try restarting your computer.
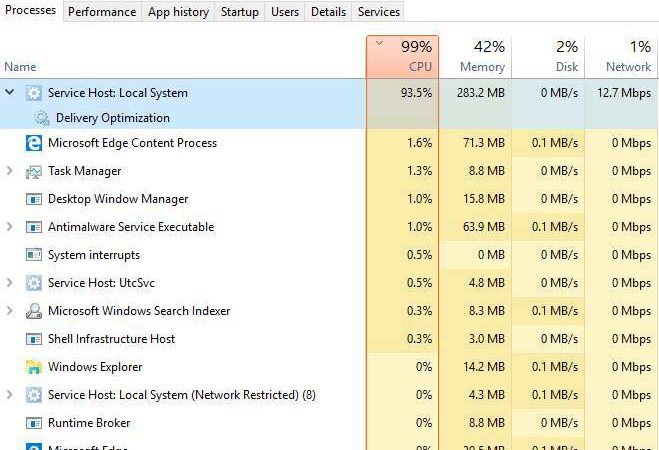
6. Turn off the Windows Update Delivery Optimization feature
Windows Update Delivery Optimization (WUDO) is a feature introduced in Windows 10 version 1809. WUDO automatically downloads and installs updates without requiring manual intervention. However, it does cause some issues such as increased CPU usage. If you are experiencing problems due to WUDO, disable it. You can do this by following these steps:
1. Click Change settings under “Delivery Optimization.”
2. Uncheck the box next to Enable automatic download and installation of updates.
3. Restart your computer.
4. Check again whether the problem still exists.
If disabling WUDO doesn’t solve the problem, try turning off Allow Downloads from other PCs. This setting allows you to receive updates from other computers on your network. To turn off this setting, follow these steps:

Tim Wiley was a tech writer for seven years at Recode. In that time, he covered everything from basic browser.js and URL parameters to XHRs, performance, malware, security, enterprise apps, social media, and Windows secrets. He also written about how to hack Signal in 2016 and how to resist, or possibly even conquer, the zero-day threat.