
Disabling the Start Menu on Windows 10 using Group Policy Editor
Microsoft introduced the Start menu in Windows 95. In Windows 8, Microsoft replaced it with the Metro UI. Now, some users are reporting that they are able to disable the Start menu. This feature allows you to customize the start screen and add tiles to it. You can even hide the taskbar completely.
The steps to do this vary depending on what version of Windows you use. Then, under “Start,” select “Show Classic Shell.” Click OK. If you want to keep the Start menu, you can always enable it again. To do this, open up the Start Screen and press the button next to Search. Type “Settings” and hit Enter. Scroll down and look for “Turn features on/off.” Select “Use classic shell.”
What Are the Possibilities of Group Policy Editor?
Group policy editor policy setting is one of those features that every administrator needs to know how to use. This tool allows you to configure almost anything about Windows 10. From setting up network connections to configuring printers, group policy editor gives you complete control over what happens on your computer.
You can even use it to limit the change made by users. For example, you could prevent users from installing applications without your approval. Or you could make sure that certain programs are always disabled by default.
The best part is that group policy editor is incredibly easy to use. All you have to do is open the program and start typing. Then hit Enter. If you want to see some examples of what you can do with group policy, check out our video tutorial.
Keeping Users from Altering Start Menu Options
Microsoft introduced Windows 10 S in October 2018. The operating system is designed to run apps without access to the full range of features found in Windows 10 Home and Pro. Microsoft claims that Windows 10 S is better for security because it doesn’t allow users to install third party software. However, some users have discovered that there are ways around this restriction. One way is to use Group Policy Editor to disable the “AllowStartMenuCustomization” policy. Here’s how you do it.
1. Open the Group Policy editor.
2. Navigate to Computer Configuration\Administrative Templates\Windows Components\Winlogon. Double-click AllowStartMenuCustomization.
3. Select Enabled and press OK.
4. Restart the computer.
5. When you log into Windows again, you’ll see the Start menu options you had before disabling the policy.
6. If you want to revert back to the original configuration, repeat steps 2–5.
7. To learn more about Windows 10 S, check out our guide here.
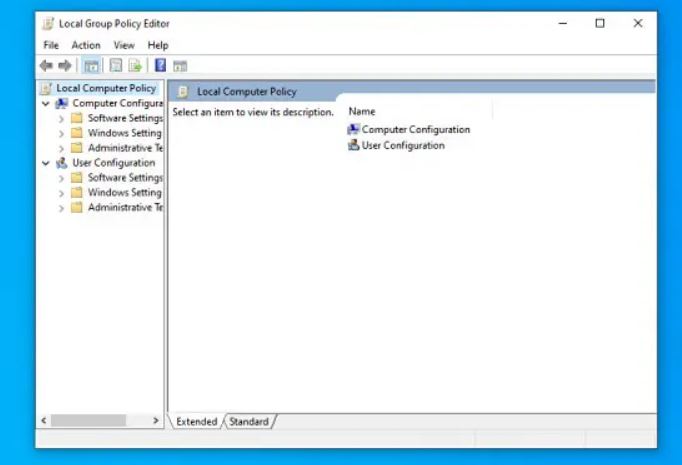
Method 1: Making Use of the Local Group Policy Editor
Open the Local Group Policy Editor. You can do this by typing gpedit.msc into the Windows Search bar. If you don’t know how to open it, check out our guide here.
Scroll down to the section named “Start Menu Settings.”
Click on the button labeled “Edit…” next to the toggle switch.
In the dialog box that appears, change the toggle switch to Enabled.
You can now close the dialog box.
To test whether the start menu setting is working correctly, type “Windows Update” into the Windows Search bar and press Enter.
Method 2: Making Use of the Registry Editor
This method is easier than the previous one. You don’t need to install any software or use third party tools. All you need to do is open the Windows Registry Editor and navigate to the following location: HKEY_CURRENT_USER\SOFTWARE\Microsoft\Windows\ Current Version\ Explorer\ Advanced. Then, find the key named “NoSetTaskbar”. If there are no values listed under the key, add a value called “1”, and set the data type to DWORD. Now, restart your computer.
To enable or disable the Start Menu setting, you need to modify the registry. The registry editor is located at the following path: HKey_CurrentUser\Software\Microsoft\windows\currentversion\explorer\advanced. There is a key named NoSetTaskbar. If there are no values under the key, add the value “1”. Set the data type to DWORDFrom now, restart your computer.
How to disable search web results on Windows 11
By default, the web search feature in the Start menu will show both local and web searches, even though you might just want to see local results. If you don’t like it, there are ways to change it. Here’s how to do it.
Turn off web search results with Group Policy on Windows 11
To disable search suggestions in Windows, follow these steps:
1. Open the Control Panel
2. Click Local Policies
3. In the left pane, expand User Configuration
4. Expand Software Settings
5. Scroll down to DisplayRecentSearchResults.
6. Uncheck the box next to EnableDisplayofRecentSearchEntries
7. Click Apply
8. Reboot the system
Turn off web search results with Registry on Windows 11
Windows 10 now includes a feature called “Search Web Results”. This tool allows you to quickly access information about your favorite sites without having to open each site individually. However, it does come with some drawbacks. For example, if you want to disable this feature, you’ll need to know how to edit the registry. In this article we’ll show you how to do just that.
How to Disable Search Web Results in Windows 10
To disable web results in Windows, follow these steps:
1. Open the Registry Editor.
2. Locate the following key: HKEY_LOCAL_MACHINE\SOFTWARE\Microsoft\Windows NT\CurrentVersion\Winlogon\Shell
3. Name the value DisabledWebResults and set the data to 1.
4. Close the Registry Editor. Restart your computer.

Tim Wiley was a tech writer for seven years at Recode. In that time, he covered everything from basic browser.js and URL parameters to XHRs, performance, malware, security, enterprise apps, social media, and Windows secrets. He also written about how to hack Signal in 2016 and how to resist, or possibly even conquer, the zero-day threat.