High CPU Usage by Sppsvc.exe software protection platform service
Microsoft Windows 10 includes a feature called “software protection,” which scans your computer for viruses and malware. This process uses up a lot of resources, especially if you’re running multiple programs at once. If it gets too high, it could slow down your PC. Here are some tips to fix this problem.
Disable the Microsoft software protection platform service
Scroll down to find the software protection option and uncheck it. You’ll no longer receive notifications about threats, but you won’t be able to scan your system anymore either.
Reinstall the latest drivers
If you’ve recently updated your graphics card driver, there’s a chance that the old version isn’t compatible with the new operating system. Try reinstalling the latest drivers. Open Device Manager and look for entries named NVIDIA GeForce GTX/AMD Radeon HD Graphics. Right-click each one and select Update Driver Software. Click Browse my Computer and navigate to where you installed the driver file. Select the.exe file and follow the prompts.
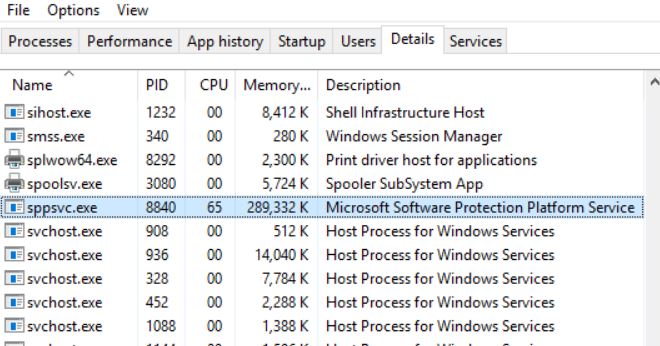
What is Microsoft Software Protection Platform (Sppsvc.exe)?
The Microsoft Software Protection Platform (Sppsvc.exe) is a process running under the SYSTEM account that runs periodically. This process scans the computer for software that is not licensed. If it finds unlicensed software, it displays messages about how to purchase licenses for the software.
What Causes SPPSVC to Use a Lot of CPU?
SPPSVC high CPU usage occurs because of invalidation. Invalidation refers to the process of deleting data from memory. When the system runs out of space in RAM, it starts to delete old files and applications. If there is no free space left, the operating system deletes some important information such as temporary files and cache files. In addition, the operating system removes the contents of the swap file. As a result, the system becomes unstable.
There are several reasons why the computer might run out of space in RAM. For example, the hard disk might become full, or the virus scanner might start scanning files again and again. To avoid this issue, you must keep enough space in RAM.
Fixing the problem will help prevent future problems. Here are some solutions to resolve the issue:
1. Delete Temporary Files
If you use Microsoft Office programs, you might see a warning about temporary files. These files are used temporarily during editing. Deleting them frees up space in RAM.
2. Clean Up Cache Files
Cache files store frequently accessed data. They speed up the performance of the computer. However, if you don’t clean them regularly, they can slow down the computer.
Fix: Sppsvc.exe is making Windows 10’s CPU use go up.
High CPU usage caused by Sppsvc is one of the most common problems faced by Windows 10 users. This article explains how to fix it.
Method 2: Start up in safe mode, then do a clean boot.
If you are unable to access Windows 10, it might be because of a virus or malware infection. You could use the following method to boot into safe mode and perform a clean boot.
1. Press the power button to turn off the PC.
2. Hold down the Shift key while restarting the PC.
3. Select the Advanced Options menu item.
4. Choose Restart.
5. Click Change settings that are currently unavailable.
Method 3: Run System File Checker
If you are having trouble accessing files on your computer, there could be many reasons why. You might be missing some important system files, or maybe you just don’t know how to fix it yourself. If you’re looking for a quick solution, we’ve got one for you. Here’s how to run the Windows System File Checker.
Step 1: Open Command Prompt
To open the command prompt, press Win+X keys together, and select “Command Prompt”.
Step 2: Type ‘cmd’
Type cmd into the command prompt window, hit Enter, and wait for the command prompt to load.
Step 3: Type’scannow’
Now type scannow into the command prompt window. Hit Enter again.
Solution 4: Malware scanning
In this article we’ll show you how to scan for malware on your computer. We’ll use free tools such as Microsoft Security Essentials and Malwarebytes Anti-Malware. These are some of the most popular anti-malware programs out there. They’re easy to set up and use, and they do a good job of finding malware.
We’ll start off by installing Microsoft Security Essentials. After downloading the program, double-click on the file to install it. When prompted, select “Run” and follow the instructions. If you don’t see the screen shown above, make sure you’ve selected “Run”.
Next, open Microsoft Security Essentials. Click on the Settings button in the upper left corner. In the settings window, under the heading “Scanner”, check the box next to “Perform Quick Scans”. Then click OK.
Now, let’s run a quick scan. To do this, click on the Start menu and type “msconfig” into the Search bar. This opens up the System Configuration utility. From here, go down to the Startup tab and uncheck everything except “Microsoft Security Essentials.” Now close the msconfig application and reboot your system.
Once you log back in, open Microsoft Security Essences again. Under the heading “Quick scans”, click on the “Start scanning now” button. A progress dialog will pop up while the scanner does its thing. Once complete, click on the “Quarantine Selected Items” button.
You should now have a list of items that were found during the scan. Double-click on each item to view further information about it. If you find anything suspicious, you can delete it by clicking on the trash icon next to the item.
Method 5 : Turn off the sppsvc Service
If you are facing issues while installing SPPSVC service, follow the steps mentioned here.
1. Open Command Prompt window.
2. Type “sc config spssvc start disabled”.
3. Press Enter key.
4. Type “sc config sppsvc startdisabled”.
5. Press Enter key. This step will restart the service.
6. Restart the machine.

Tim Wiley was a tech writer for seven years at Recode. In that time, he covered everything from basic browser.js and URL parameters to XHRs, performance, malware, security, enterprise apps, social media, and Windows secrets. He also written about how to hack Signal in 2016 and how to resist, or possibly even conquer, the zero-day threat.