How To Compress ZIP a File in Windows 10 [FULL GUIDE]
Zip files are used to compress large amounts of data into small packages. They are often used to store documents, music, videos, images, etc., and make it easier to transfer them over networks. In addition to archiving files, zip files can also be used to encrypt sensitive information.
You can use the built-in ZIP functionality in Microsoft Windows 10 to create and unpack zip files. This article explains how to do both tasks.
Create a New Archive File
Click Create compressed folder here. A window will pop up asking you what type of archive you want to create. Select.ZIP. Then enter a name for the archive and press Enter.
The newly created archive will now show up under the Compressed folder. To view the contents of the archive, double-click on it.
Unzip an Existing Archive
If you already have an archive file, you can extract its contents using the same steps described above. However, there is one important difference: you must specify the location where you want to save the extracted files. If you don’t, the files won’t end up anywhere.
How do you zip files in Windows 10?
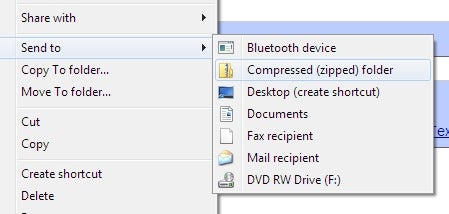
You can use Windows Explorer to drag and drop files into a zipped folder. But there are some things you might want to know about creating a compressed folder. You can do this by rightclicking the file and choosing “Send to…,” then “Compressed Folder.” Or you can just press CTRL+Z while holding down the SHIFT key. Either way, you’ll see a dialog box asking whether you want to send the selected items to a compressed folder. Click OK.
If you don’t want to make a compressed folder, you can still use Windows Explorer to drag files into a folder. Just hold down the CTRL key while dragging the files. Then, once you release the mouse button, you’ll notice that the files are now highlighted in blue. Rightclick the file and choose Send to Compressed Folder. If you want to unzip the folder, just repeat the process. Hold down the CTRL key while clicking the folder name. Release the mouse button, and you’ll see the contents of the folder again.
Windows 10 file unzipping instructions
Doubleclicking the zipped folder will automatically extract the contents. If you want to do it manually, just open the zip file and drag the extracted files into the destination directory. You can also use 7Zip to extract the contents.
‘Extract all’ the entire file after unzipping it
When extracting multiple files, it’s important to make sure that everything goes smoothly. If you accidentally unzip the entire archive, you won’t be able to access the individual files anymore. This happens because the archive contains one big file, which includes all the others.
To avoid such problems, it’s best to use the Extract button instead of the Extract All option. This way, you’ll be able to see what’s inside each folder without having to open every single zip file. You can do this by selecting the Extract button next to the Archive File name.
If you want to extract the whole archive, you can simply press Ctrl+A. This will automatically select all the files in the archive, allowing you to choose the ones you want to extract.
You can also use the Extract button to extract just one file. Simply highlight it and click the button.
specific files using drag and drop to unzip
Zip files are great because you can compress many different types of data into one small package. However, extracting individual items from a zip file can be tricky. If you want to extract just one item, you must open it individually. But what happens if you want to extract several items at once? In this article we’ll show you how to unzip several files at once.
Step 1: Open the Zip File
To start, you’ll need to open up the zip file. To do this, simply double-click on the zip file icon. This opens up Windows Explorer and lets you browse inside the zip file. Once you’ve found the folder containing the files you want to extract, select the file(s) you’d like to extract.
Step 2: Extract Individual Files
Once you’ve selected the files you want to unzip, hit Ctrl+X to extract them. This extracts each file individually. Now you’re ready to move on to step 3.
Step 3: Create Archive
Now that you’ve extracted the files you wanted, you can create an archive out of them. To do this, go back to Windows Explorer and hit Shift+Ctrl+A to create a new archive. A dialog box appears asking whether you want to add the contents of the current directory to the archive. Click Yes.
With the Ribbon Menu, Zip One or More Files
The ribbon menu is a great way to quickly zip up multiple files without having to open each one individually. You can use it to compress several images into one ZIP archive, or even combine several PDF documents into a single document.
To do this, simply select the files you want to include in the ZIP archive, rightclick anywhere inside the folder where they are located, and choose “Compress”. A window will pop up asking you what type of compression you’d like to use. Choose either “All files”, “Files newer than X days ago”, or “Only files I’ve opened recently”. Click OK and wait while the files are zipped up. When done, the newly created ZIP archive will be displayed in the main window.
You can now drag the ZIP file onto another location or email client to send it off. If you’re sending it via email, make sure to add a subject line and/or description.
If you want to zip up just one file, you can still do it manually. Just double-click the file you want to include, and follow the prompts.
Note: This method won’t work if you’re trying to zip up a directory, because there isn’t a separate option for that.
A file or folder can be added to an existing ZIP file.
If you want to add one or more files to an existing ZIP archive, just drag the files into the archive window. You don’t even need to open the ZIP file first; it’ll do that for you. If you’re adding multiple files, hold down Ctrl+Shift while dragging. This will make sure all the dragged files are added to the ZIP file. Note that you cannot add folders to a ZIP file.
To extract all the contents of a ZIP file, use the Extract All button.
Backup and Storage in Windows 10
How much free space do you have left on your computer? If you don’t know how to find out, you’re probably asking yourself “how did I end up here?” Windows 10 offers some great tools to help you reclaim lost space, including one that allows you to shrink your partitions without losing data.
In addition to being able to see what programs are taking up the most space, you can use the File History tool to backup important documents and photos. You can even mount ISO images directly from within Windows Explorer.
You can also zip files and folders into smaller archives, making it easier to move large amounts of data around. And finally, you can format a hard drive for both Mac and Windows machines, allowing you to easily transfer files between computers.

Tim Wiley was a tech writer for seven years at Recode. In that time, he covered everything from basic browser.js and URL parameters to XHRs, performance, malware, security, enterprise apps, social media, and Windows secrets. He also written about how to hack Signal in 2016 and how to resist, or possibly even conquer, the zero-day threat.