How to Disable / Enable Windows Recovery Environment on Windows 10?
Windows 10 recovery environment is a special partition created during installation process of Windows 10. It contains all the files required to restore the system back to its original state after accidental deletion or corruption of some critical files.
In case of any kind of damage to the operating system, user may recover his/her system by restoring the backup made before the damage occurred.
This article explains the different methods used to create the recovery environment.
1. Create Recovery Media Using Windows 7 DVD ISO Image
You can create a bootable Windows 7 DVD image using the Windows 7 DVD ISO image provided by Microsoft. To create the recovery media, follow these simple steps:
Step 1: Insert the Windows 7 DVD into the computer and launch the setup wizard.
Step 2: Click Next when prompted to select language and keyboard settings.
Step 3: Select Install Now and click Next.
Step 4: Choose Customize my PC and click Next.
Note: You must choose Customize my PC to access the advanced options.
Step 5: Under System Preparation, select Repair your Computer and click Next.
Step 6: Type diskpart and press Enter.
Type clean and press Enter.
Step 7: Type list vol and press Enter.
List volume information for C:\ and D:\.
How to Boot Windows into the Recovery Environment?
Windows booting into the recovery environment is a very useful feature when things go wrong. However, it can also be used to perform some tasks that aren’t possible otherwise. Here’s a quick guide to getting started with the Windows recovery environment.
1. Power Off Your Computer
Turn off your computer by pressing the power button. Wait until the screen goes black before unplugging the AC adapter.
2. Restart Your Computer
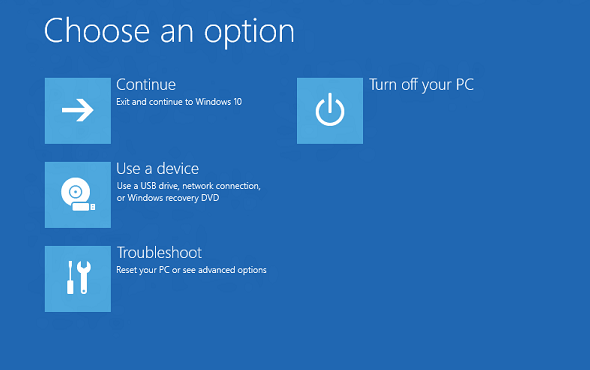
Press the power button again to turn on your computer. When the startup menu appears, press R to enter the recovery environment.
3. Select Safe Mode
Select the safe mode option from the Startup Menu. Press Enter to continue.
4. Perform Basic Tasks
You can now access basic tools like Disk Management, Command Prompt, and Device Manager.
5. Restore Files
Use the restore files function to recover lost or corrupted system files.
6. Reboot Into Normal Mode
Reboot your computer back into normal mode.
7. Exit the Recovery Environment
Exit the recovery environment by selecting exit.
8. Shutdown Your Computer
Solution 1: Checking the status of WinRE
To verify the status of WinRe, type reagentc/info into the command prompt. This will display information about the current state of the Windows recovery environment. If it says “Disabled”, you will need to follow one of the following methods to enable the Windows Recovery Enviroment.
Method 2 – Enable WinRE via Command Prompt
1. Open the command prompt window.
2. Type regedit.exe and press Enter.
3. Navigate to HKEY_LOCAL_MACHINE\SOFTWARE\Microsoft\Windows NT\CurrentVersion\Winre.
4. Name it DisableWinRE and set the value to 0x00000001.
5. Close the registry editor.
Solution 2: Disable WinRE using the Elevated Command Prompt.
If you’re having issues with Windows 10, it could be because you have enabled the Windows Recovery Environment (WinRE). If you’re experiencing problems like freezing, slow startup, and frequent crashes, disabling WinRE might help. In this article we’ll show you how to do it without needing a Windows Installation Media or USB Drive.
To begin, make sure you have a working Internet connection. Then, download and install the free tool called “Disconnect”. Open the program and select “Startup Repair”, then follow the instructions. After completing the process, restart your computer and check whether the problem persists.
Next, launch an elevated command prompt window. Type the following command and hit Enter:
sc config winre startdisabled /f
You will be prompted to confirm the change. Press Y to continue. Now, type the following command and press Enter:
shutdown -r now
When you log back into Windows, you won’t see WinRE anymore.
Solution 3: Disable WinRE using the Registry Editor Utility.
To disable WinRE, simply delete the value of BootExecute within theRegistryEditor. Once the value is deleted theWinREenvironmentwill be disabled.
In order to reenable WinRE, simply add BootExecute set back into the registry editor and reboot your computer.
This method works even if you are running Windows 7 or earlier versions of Windows.
Solution 4: How to Access the Windows Recovery Environment
There are two methods to reenabling the Windows recovery environment. One method uses an external program called WinRE Repair Disk. The second method uses a built-in utility called System Restore, which you can use to restore previous system configurations.
Using the Command Prompt, enable WinRE.
To activate the WinRE, type “reagentc.exe / enable” in the command prompt and press Enter. You will be prompted whether you wish to modify the system registry; click Yes to allow the changes to take effect.
Once the WinRE is enabled you will see a message stating that the WinRE is ready for use.
To enable WinRE, use RegistryEditor.
To enable the WinRE option, you must edit the registry. This will allow you to reboot into WinRE if you loose access to your hard drive, and it will work even if you do not have any other operating system installed.
This video explains how to use RegEdit to make changes to the Windows registry. You’ll learn about the different sections of the registry, including HKEY_LOCAL_MACHINE\SOFTWARE\Microsoft\Windows NT\CurrentVersion\Winlogon, where you can change the default logon screen displayed upon startup. You’ll see how to navigate the registry tree, add keys, delete keys, set values, view data, export data, import data, backup key values, and much more.

Tim Wiley was a tech writer for seven years at Recode. In that time, he covered everything from basic browser.js and URL parameters to XHRs, performance, malware, security, enterprise apps, social media, and Windows secrets. He also written about how to hack Signal in 2016 and how to resist, or possibly even conquer, the zero-day threat.