How to Disable User Account Control (UAC)
User Account Control (UAC), introduced in Windows Vista, is designed to help administrators control what users can do on a system. In addition to preventing malware from taking over a machine, it provides a way to restrict access to certain folders and files. This article explains how to turn off UAC on Windows Server 2008 R2 and later operating systems.

What Exactly Is UAC?
UAC stands for User Account Controls and is part of Windows Vista. UAC helps prevent malicious software from changing settings on your computer without your knowledge. UAC helps protect you from viruses, spyware, and other harmful applications. UAC allows parents to limit access to certain web sites for their kids.
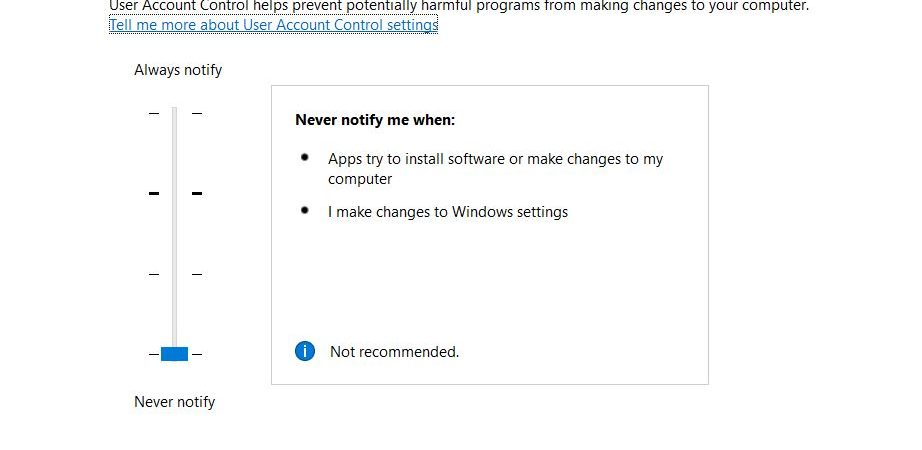
What the UAC Slider Levels in Windows 10 Mean
There are four different UAC settings available on Windows 10: On, low, medium, and full. These levels determine how much access you give to programs while running. You can change the slider to adjust what each level allows.
When you set UAC level on Windows 10 to Low, Medium, Medium, or Full you will see an icon near the clock in the task bar. This indicates which UPC setting is active.
The following table explains the difference between each UAC setting.
On – Allowed everything
Low – Allow most things except administrative tasks
Medium – Allow some things like installing apps
Full – Allow no program changes
How to Turn Off UAC Using the Control Panel
UAC stands for User Account Control. This feature allows you to control what actions are performed on your computer without requiring administrative privileges. You can use it to protect yourself against malware and malicious programs. However, there are times when you want to turn off UAC temporarily. Here’s how to do it.
Step 1 – Open the Start menu and type regedit into the Search box. Click OK to open the Registry Editor.
Step 2 – Navigate to HKEY_LOCAL_MACHINE\SOFTWARE\Microsoft\Windows NT\CurrentVersion\Winlogon.
Name the value DisabledCompatibilityCheck and set the data to 0x1.
Step 4 – Close the Registry Editor. Restart your PC and log back in.
You can now easily enable/disable UAC again whenever you like.
Using the Command Line to Disable UAC
To disable UAC, you need to know how to use the command prompt. You can do it manually, or you can use a tool like Group Policy Editor. Both methods work well, but I prefer the latter because it allows me to make changes to multiple computers at once. If you want to learn about both options, read on.
Manually Edit the Registry
The easiest way to disable UAC is to edit the registry. Open up regedit.exe and navigate to HKEY_LOCAL_MACHINE\SOFTWARE\Microsoft\Windows NT\CurrentVersion\Winlogon. Create a DWORD value called “NoUAC” and set it to 0x1. Restart Windows and you’re done.
Group Policy Editor
If you don’t feel comfortable editing the registry, you can use Group Policy Editor to accomplish the same thing. Double-click Enable Local Policies and select Allow Log On Without Prompting. Set the value to Disabled. Click OK twice and restart.
How to Use Group Policy Editor to Disable UAC
UAC stands for User Account Control. It is a security feature built into Windows Vista and later versions of Windows operating systems that prevents malicious software from being executed unless it is specifically allowed to do so. In short, UAC helps protect you against malware attacks. However, there are times when you might want to disable UAC temporarily. For example, you might want to install a program that requires administrative privileges, such as installing Microsoft Office 2016. Or maybe you just want to test out a new piece of software that doesn’t require administrative access. If you’re having trouble figuring out how to disable UAC, here’s what you need to know.
Step 1: Open the Group Policy editor. To open the Group Policy editor, type gpedit.msc into the Start menu Search box, and press Enter. Click “Start,” select “Run.” Type “gpedit.msc” into the textbox, and press Enter. You’ll see the Group Policy Editor window.
Double-click the entry named “Do Not Display User Account Control dialog boxes for administrators.” Select Enabled, and click OK.
Step 3: Restart your computer. When prompted, log off, and then log back on again. Your UAC settings should now be disabled.
How to Turn Off UAC Using the Windows Registry
UAC stands for User Account Control, and it’s a security feature built into Windows Vista/7/8/10. This article explains how to disable UAC using the Windows Registry.
The purpose of UAC is to prevent malicious software from running without permission. If you don’t want to use UAC, you can simply turn off the setting. However, there are some situations where you might want to temporarily disable UAC. For example, if you’re installing a program that requires administrator privileges, you’ll need to temporarily disable UAC while the installer runs. You could also do this if you’re trying to run malware removal tools like Malwarebytes’ AntiMalware or HitmanPro. In those cases, you’ll need to enable UAC again once the tool finishes running.
To disable UAC permanently, open the Registry Editor and navigate to HKEY_LOCAL_MACHINE\SOFTWARE\Microsoft\Windows NT\CurrentVersion\Winlogon. Create a DWORD value named EnableLUA and set its data type to REG_DWORD. Set the value to zero (0).
You can reenable UAC by opening the Registry Editor and navigating to HKEY_CURRENT_USER\Software\Microsoft\Windows\CurrentVersion\policies\System. Create a DWORD key called EnableLUA and set the data type to REG_SZ. Enter “1” in the text box and press OK.
If you’d rather just temporarily disable UAC, you can do that too. Open the Registry Editor and navigate HKEY_CURRENT\Control Panel\Desktop. Create a string value called ShellNoFailures and enter “2”.
You can reenable the UAC prompt by changing the value to “3”, and you can restore the original settings by changing the value to either “1” or “0”.
Turn off User Account Control in Windows 11
Windows 10 introduced User Account Control (UAC), a security feature designed to prevent malicious software from running without permission. Unfortunately, many people are unaware of how to disable it, and end up being locked out of important programs and files. In this article, we’ll show you how to turn off UAC on Windows 10, 8.1, 7, Vista, XP, 2003, 2000, ME, NT 4.0, 95, 98, and 3.11.
Use Group Policy to disable User Account Control.
To disable UAC, follow these steps:
1. Open the Start menu.
2. Type gpedit.msc into the Search box.
3. Click Gpedit.msc.
4. 5. Double-click User Accounts.
6. Select Enabled under Allow logon locally.
Using the Registry, disable User Account Control.
To disable UAC, follow the instructions below. If you don’t know how to do it, we’ve got you covered.
1. Open regedit.exe.
2. Navigate to HKEY_LOCAL_MACHINE\SOFTWARE\Microsoft\Windows NT\CurrentVersion\Winlogon.
3. Name the value DisableUac and set the data type to REG_DWORD. Set the value to 1. Click OK twice to exit both dialog boxes.
4. Restart your computer.
5. Log off and log back in. You’ll notice that the UAC prompt no longer appears.
6. If you’re still having trouble, try disabling UAC entirely. Under “Change PC settings,” uncheck “Turn on notifications and security prompts for apps.”

Tim Wiley was a tech writer for seven years at Recode. In that time, he covered everything from basic browser.js and URL parameters to XHRs, performance, malware, security, enterprise apps, social media, and Windows secrets. He also written about how to hack Signal in 2016 and how to resist, or possibly even conquer, the zero-day threat.