
How to Enable or Disable Startup Items in Windows 10
There are many ways to remove programs from starting automatically. Some programs will ask if they want to start up each time you turn on the computer. If you don’t want them to do that, here are some tips to help you keep unwanted programs out of your startup list.
1. Click Uninstall a program.
2. Locate the program you wish to uninstall and select it.
3. Select Remove.
4. When prompted, confirm removal.
5. Repeat steps 2–5 for each program you’d like to remove.
6. Restart your computer.
7. You’re done!
Disabling Startup Programs in Windows 11
There are two methods to disable programs from starting up automatically on Microsoft Windows 10/8/7: the Task Manager and the Settings app.
In the Task Manager, open the Start menu and type “Task Manager.” Select it from the list and press Enter. Click the Processes tab and find the process named “explorer.exe,” double-click it, and uncheck the box next to “Startup Type:” If you’d like to start Explorer manually, check the box next to “Run As Administrator.”
You’ll see options for turning off Wi-Fi, Bluetooth, Location Services, and others.
Disabling Startup Programs in Windows 10
Open up the Settings app, enter “startup” into the search bar, then select “Startup”. You’ll see a list of apps that are set to run every time you turn on your computer. If you’re tired of seeing one of those apps pop up each time you boot up, here’s how to disable it.
Click the cog icon to open the Startup Apps panel. Scroll down to find the item you’d like to disable, and toggle it off. Then, hit Apply. Your PC won’t restart just because you turned off an app, but you’ll no longer see it show up in the startup menu.
Disabling Startup Programs in Windows 10
Windows 10 includes some handy tools to help you manage what apps start up automatically when you turn on your computer. But there are times when you want to disable certain programs from running every time you boot up. Here’s how to do it.
To access the Start Menu Settings, press the Windows key + I. From here, select Control Panel. In the left pane, under System and Security, click on the Advanced system settings link. On the next screen, scroll down to the Startup tab. Click the Change button next to each item listed here. If you don’t see the option to change anything, try restarting your PC.
If you’d rather use the Task Manager tool, open it by pressing CTRL+SHIFT+ESC. Then, click on the Processes tab. Scroll down to the Startup section, and look for items marked as “Automatic.” Right-click on one of those entries, and choose End task. Repeat this process for any additional items you wish to disable.
How to Use the Registry Editor to Remove Programs on Startup
The Windows Registry is one of those things you don’t want to mess around with unless you know what you’re doing. But there are times when it’s necessary to make changes to the system settings, such as adding or deleting keys, values, or subkeys. In some cases, you might even need to edit the value data itself. If you do decide to go down this path, however, you’ll want to take precautions to ensure that you don’t accidentally delete something important. Here’s how to use the Registry Editor to safely perform these tasks.
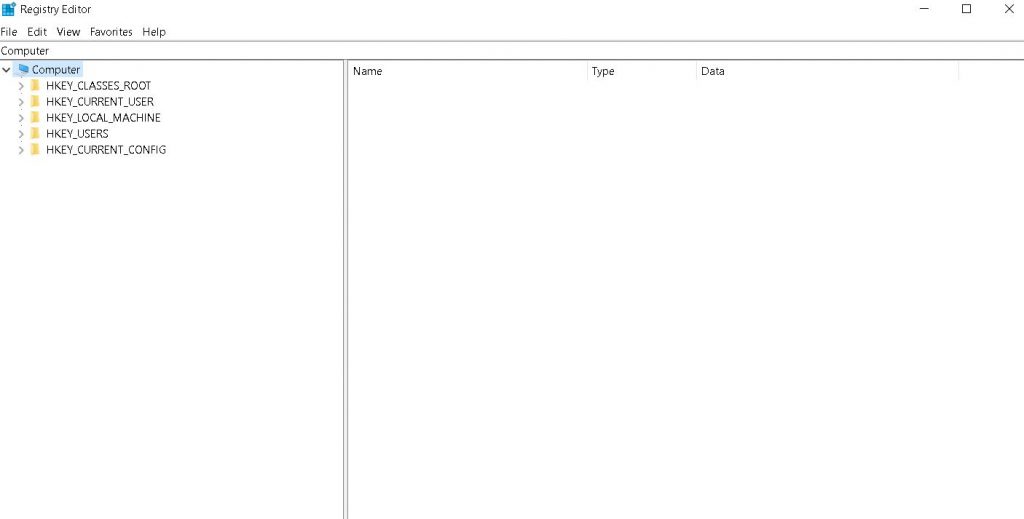
Step 1: Open the Registry Editor
Type regedit into the box and press Enter. You’ll see the following screen:
If you’ve never used the Registry Editor before, you might find the interface intimidating. Don’t worry; we’ll walk you through each step.
Step 2: Navigate to the correct key
In the left pane, navigate to HKEY_LOCAL_MACHINE\SOFTWARE\Microsoft\Windows NT\CurrentVersion\Winlogon. This is where the default logon scripts reside.
1. Launch the registry
The Windows Registry is a database used by Microsoft Windows operating systems to store information about programs and hardware devices installed on a computer system. This includes settings such as default applications, startup options, and shortcuts. You can open it by pressing the start menu key and typing “regedit”.
2. Navigate to the relevant run keys.
There are several different ways to find out what the correct run key is. You can use the Windows Key + R keyboard shortcut to open up the Run dialog box. Type “runas /?” and press Enter. This will show you the command prompt window where you can type commands like “cd c:\windows”.
You can also look at the registry editor. Open up the Registry Editor by typing regedit into the start menu and pressing enter. In the Search bar, type in “shell”, and then select Shell Keys. Press OK. Now, scroll down to the bottom of the list and delete everything under the heading Shell. Then, close the Registry Editor and reboot your computer.

Tim Wiley was a tech writer for seven years at Recode. In that time, he covered everything from basic browser.js and URL parameters to XHRs, performance, malware, security, enterprise apps, social media, and Windows secrets. He also written about how to hack Signal in 2016 and how to resist, or possibly even conquer, the zero-day threat.