How To Update the BIOS on an MSI motherboard.
Motherboards are one of the most important parts of our computers. They help us connect everything together, including hard drives, RAM modules, graphics cards, sound cards, etc. If we want to upgrade those components, we must update the motherboard’s BIOS. However, updating the BIOS isn’t easy. You have to know how to do it correctly. Otherwise, you could damage your computer. In this article, I will show you how to update the BIOS on an MSI motherboard.
Step 1: Download the latest version of the BIOS update utility.
Step 2: Burn the ISO image to a USB flash drive.
Download the ISO image and save it to your desktop. Then, open up Windows Explorer and navigate to the folder where you saved the ISO file. Right-click the ISO file and select “Burn Image.” This will start the process of burning the ISO file to the USB flash drive. When the process finishes, you’ll see a confirmation screen telling you that the operation completed successfully.
Step 3: Insert the USB flash drive into your computer.
Once the USB flash drive is inserted into your computer, you’ll see a notification window asking whether you want to install the software. Click Yes.
Considerations for the MSI BIOS Update
The following are some things you might want to consider while updating your motherboard’s BIOS.
1. Make sure you’re running Windows 10 Pro 64bit.
2. You must use a USB Flash Drive with at least 8 GB capacity.
3. If you plan to install a SSD, make sure it is formatted NTFS.
4. Download the latest BIOS file from the manufacturer’s website and save it to a USB Flash Drive.
5. Connect the USB Flash Drive to your computer.
6. Run the “Flash Update Utility”.
How is the BIOS of MSI updated?
MSI motherboards require you to use the UEFI firmware to update the BIOS. This tutorial explains how to do it.
M-Flash BIOS updates
MSI has announced that it will release a new version of its motherboard BIOS called M-Flash 2.0. This new firmware allows you to update the BIOS without having to connect the motherboard to a computer via a serial port. Instead, you can use a USB flash drive to install the updated BIOS.
The new firmware will allow you to update the BIOS even if there are no operating system drivers installed on the computer. In addition, the new firmware supports Intel Optane memory modules.
Step 1: Format a Flash Drive
Before you start installing Windows 10, make sure your USB flash drive has enough space to install it. You don’t want to run out of room halfway through the installation process. To do this, format your USB flash drive. This step is necessary because Windows needs somewhere to write files to during the installation process.
To format your USB flash drive, insert it into your computer and open up Disk Management. Select the partition where you want to install Windows 10, right-click on it, select “Format,” and choose NTFS. Click OK.
If you’re running Windows 8.1, use the steps above to format your USB flash drive and then follow the instructions here to upgrade to Windows 10.
Step 2: Download the Update Files
To download the latest BIOS update files, you’ll need to know what type of motherboard your system uses. If it’s a desktop PC, you’re probably looking at a Z87 chipset motherboard like Asus’ P8Z77-V Pro. If it’s a laptop, you might have a B75 chipset board like Lenovo’s ThinkPad X1 Carbon Gen 3.
Once you’ve identified your motherboard, open up the link we sent you earlier and follow the instructions. You’ll see a list of different models and versions of your motherboard. Find yours and select the version you want to download. Then click on the green button to start downloading the files. Once complete, double-click on the.zip file to extract the contents.
Now, go ahead and run the downloaded file. This will install the latest BIOS update for your motherboard. After installation, reboot your machine and enjoy the improved performance.
Step 3: Load Update Files to USB Drive
Extract the BIOS update files to a folder on your computer. You can use Windows Explorer or Command Prompt to do this. If you’re using Windows Explorer, select the BIOS zip file and press Ctrl+X to open the context menu. Then, choose “Extract All”. Once the extraction process completes, browse to the location where you saved the extracted files.
If you’re using Command Prompt, enter the following commands:
cd \
mkdir BIOS\update\files\
cd BIOS\update\files
7z x -y BIOS_Update_Files.zip
Hit Enter after entering each command.
Now, insert the USB flash drive into your computer and double-click on the BIOS_Update_Files folder. This will launch the Setup Wizard. Follow the instructions to complete the installation.
Once the BIOS update files are installed, reboot your computer.
Step 4: Update BIOS
To update the BIOS, you need to shut down your computer, insert the USB flashdrive holding the BIOS update files and then restart it. After rebooting, you’ll see an option called “MFlash Mode”. Select yes and press enter. Then select the USB drive containing both the BIOS update files and the BIOS folder and click the BIOS update file to start the update process.
BIOS Flashback is used.
The BIOS flash tool is one of those things you never think about unless something goes wrong. But it’s important to know how to use it because it allows you to update your motherboard’s firmware without having to take it apart. If you’re looking to upgrade your motherboard, we’ve got some tips for you.
What is the version of the BIOS on my MSI motherboard?
Finding the BIOS version of your motherboard is easy. All you need is a multimeter and some patience. If you don’t know what BIOS version you’re running, it’s still possible to figure out.
To find the BIOS version of your board, simply plug in the multimeter into one of the USB ports on your computer. Then, connect the probe leads to ground and power. Next, turn off the PC and unplug everything except the keyboard and mouse. Finally, boot up Windows 10 and wait for it to load. Once the desktop appears, hold down the Shift key and press Enter. A black screen will pop up, followed by a prompt asking whether you want to enter UEFI mode. Select Yes. Scroll down to the bottom of the list and look for “BIOS Version.”
If you see something like “0x1A,” that’s the latest BIOS version installed on your system. If you see anything else, it’s probably older than 0x1A.
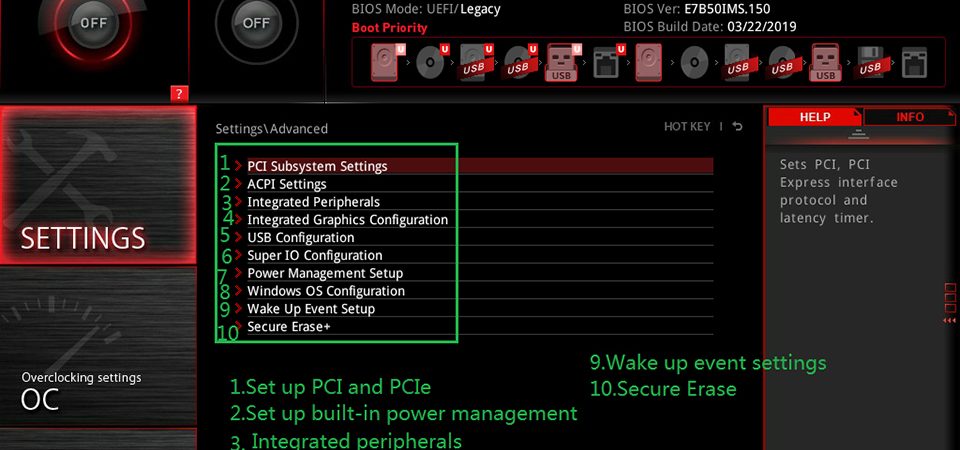
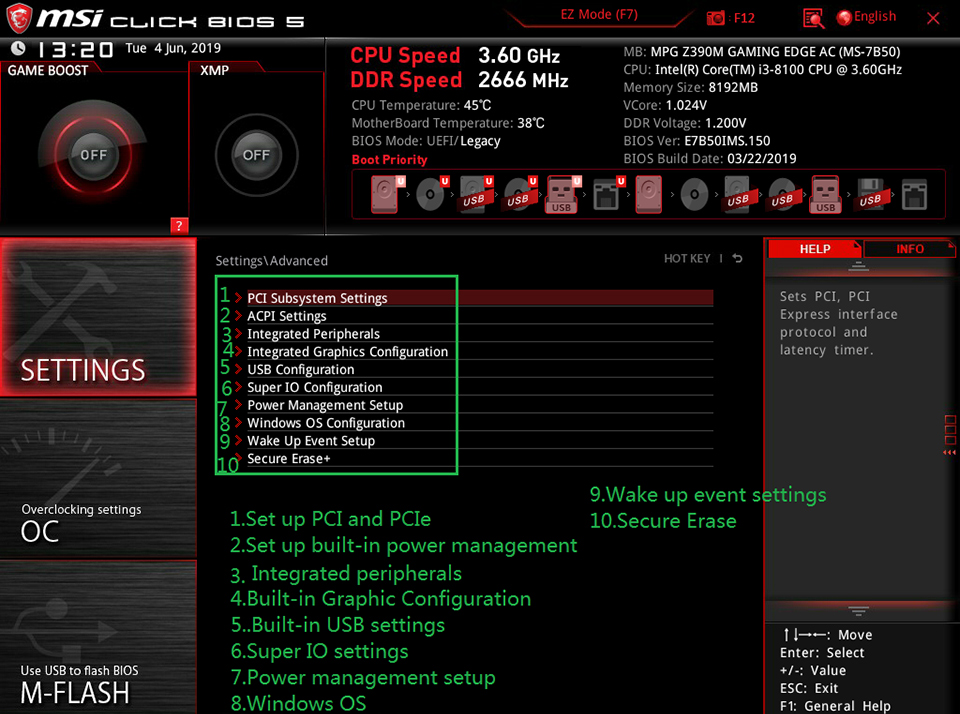
How do I enter MSI BIOS?
To access the BIOS, hold the delete or f2 key during boot up. You’ll see a screen like this one:
If you’re having trouble accessing the BIOS, try holding down the delete or f1 keys while powering on your PC. If you still don’t see anything, it could be because you’ve got a UEFI motherboard. In that case, you’ll need to use the F8 option during startup.
Press Delete or F2 to enter the BIOS
Look around to find the options menus
Save and restart your computer after making changes

Tim Wiley was a tech writer for seven years at Recode. In that time, he covered everything from basic browser.js and URL parameters to XHRs, performance, malware, security, enterprise apps, social media, and Windows secrets. He also written about how to hack Signal in 2016 and how to resist, or possibly even conquer, the zero-day threat.