Werfault.exe Process | Is It Safe?
Some users are reporting that this process is consuming way too much memory and CPU. This happens because it keeps trying to open files that don’t exist. As a workaround, try closing all instances of Werfault, restarting your computer, and opening Werfault again. If you still experience problems, please use the Fixit tool to troubleshoot the issue.
What is the WERFault.exe (Windows Problem Reporting) process?
Windows Defender Antivirus is one of the most popular free antivirus programs around. However, it does come with some drawbacks, such as being unable to detect certain malware types. One of those types are Trojans disguised as legitimate software. These Trojans are called Werfault.exe because they use the same method to hide their presence as the anti-malware program.
The good news is that you don’t have to worry about finding out what’s causing problems on your PC. You just need to look for the following symptoms:
• A file named “Werfault.exefile” appears on your desktop.
• Your system starts acting up, including freezing and crashing.
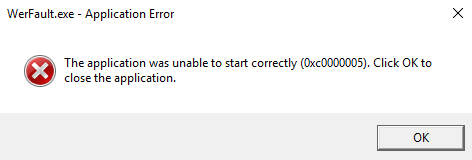
common Werfault.exe (Windows Problem Reporting) errors
When you see an unusually high number of CPU usage spikes, check whether there is anything wrong with the Werfaults.exe process. This process runs every 15 minutes and checks whether the system is working properly. If Werfaults.exe uses too much memory, it might indicate that you are experiencing a problem. You could use Task Manager to investigate further.
Check whether the Werfaults.exesystem file and the Werfaults.registry key are corrupt or missing. These files store information about the operating system. Deleting these files won’t solve the issue. Instead, you’ll want to reinstall the operating system.
If none of the above steps help, contact our support team. They’ll provide you with instructions on how to fix the problem yourself.
Errors relating to Windows Problem Reporting (Werfault.exe) explained
Werfault.exes are one of those things you don’t want to see pop up on your screen. They’re basically error messages that Microsoft sends out to let you know there’s something wrong with your computer. These messages come in handy because they tell you exactly what’s causing the issue and how to fix it. However, sometimes they just won’t go away. In fact, they’ll keep popping up over and over again, even though nothing seems to be wrong with your system. If this happens, you might think twice about whether or not you really need to pay attention to every single one of them. Luckily, we’ve got some tips to help you deal with these annoying messages.
First off, you should always try to resolve the problem yourself before calling tech support. This way, you’ll save money and avoid having to wait around for hours on end while someone tries to figure out what’s wrong with your computer. You can do this by following our guide to fixing common hardware issues. Once you’ve done that, you can move on to the next step.
If you still find yourself unable to solve the problem on your own, you can use a program called Werfault.exe Fix Tool to automatically scan your hard drive and identify files that contain errors. Once you’ve identified the problematic file(s), you can delete it and restart your computer.
Of course, you could also simply reinstall Windows. But if you already have a working copy of Windows installed, why bother? Instead, consider upgrading to a newer version of Windows. For example, if you’re running Windows 7, you can upgrade to Windows 10. Or, if you’re running Vista, you can upgrade to 8.1. Either way, remember to backup your data beforehand.
Step 1: Run the System File Checker
To run the System File Check (SFC), type “sfc /scannow” into the command prompt. This tool checks your Windows operating system for errors, missing files, invalid registry entries, and other issues. If you receive a warning about one of your programs, it could mean that there are some issues with your software. You’ll want to fix those before continuing.
Fixing problems found by the SFC will help improve your PC’s performance.
Step 2: Use the Windows Memory Diagnostic tool
The Windows Memory Diagnostic Tool is free software that you can use to scan your PC for memory issues. This method uses the tool to determine whether there are problems with your RAM modules. If it finds anything wrong, it provides a solution. You’ll need to download the tool from Microsoft’s site. Once downloaded, run the program. When prompted, select “Scan Now.” Wait while the tool does its thing. When finished, look over the list of errors and fixes. Click the Fix button next to each error to apply the suggested changes.
Step 3: Perform a Disk Cleanup
The Disk Cleanup utility allows you to delete unnecessary files from your computer. This method helps to free up space on your hard disk drive.
Useful Tips:
– If you want to clear your Recycle Bin, select “Recycling Bin.”
– Select “Temporary Internet Files,” “Cookies,” “Download History,” or “History.”
– Click “Clean Up Now.”
– After the process completes, restart your system.
Step 4: Scan your computer for possible viruses and malware
Check your computer for malware weekly. This includes checking for spyware, adware, browser hijackers, keyloggers, trojans, rootkits, worms, and other malicious software. You can use free tools like Malwarebytes Anti-Malware Premium, AdwCleaner, Spybot Search & Destroy, CCleaner, etc. These are just some examples; there are many others out there. You don’t want to miss anything.
You should scan your computer once every week, even if you think it’s clean. If you’re having problems, try scanning again.
If you find something suspicious, delete it immediately. Don’t worry about making mistakes. Just do what feels right.
There are many reasons why you might want to check your computer for malware. For example, maybe you’ve been getting pop-up ads, and you suspect that someone is trying to steal your personal information. Or perhaps you’ve noticed that your Internet connection speed seems slower than usual. In either case, it could be because your computer is infected with malware.
The best way to keep your computer safe is to make sure that you regularly update your anti-virus software. There are several ways to do this. First, you can download the latest version of the anti-malware tool directly from the manufacturer’s site. Second, you can install the most recent version of the tool using the instructions included with your current version. Finally, you can run a third party tool such as Malwarebytes Anti-malware Premium.
We recommend using an antivirus product like Windows Defender. However, we know that not everyone uses one, so here are three additional options:
AdwCleaner – Free utility that removes unwanted advertisements, cookies, temporary files, and history from your web browsers.
Step 5: Turn Windows Problem Reporting off
Windows Error Reporting (WER) is a feature built into every version of Microsoft Windows since XP SP2. It allows users to report problems directly to Microsoft without having to call tech support. This helps reduce wait times for technical assistance and increases customer satisfaction. However, WER can also cause performance issues on some systems. If you’re experiencing slow downs, crashes, or freezes, and none of the previous solutions are working, try disabling WER.
To disable WER, follow these steps:
1. Click Services
2. Locate “Windows Error Reporting” under the heading “Services.” Right-click it, and select Properties.
3. On the General tab, uncheck the box next to “Start the service automatically,” and click OK.
4. Restart your computer.
Frequently Asked Questions
Why uses the network when running werfault.exe?
WERFault is one of those programs you never notice running in the background. But it’s there. If you use Windows 10, chances are good that you’ve run into WERFault at some point. It pops up whenever you try to open an application or file. You might think it’s just a harmless notification, but it’s actually doing something important behind the scenes.
Werfault uses a feature called Network Access Protection (NAP) to keep track of what applications are accessing the internet. This helps prevent malicious software from sneaking onto your computer. Unfortunately, NAP isn’t perfect. Sometimes, WERFault gets confused and thinks that an application needs to connect to the internet. When that happens, it tries to contact Microsoft’s servers to let them know about the problem.
If you want to make sure that WERFault doesn’t bother you anymore, here’s how to turn off its ability to report errors.
How WerFault.exe Responds to a Program Crash
WER stands for Windows Error Reporting. It’s a system component that handles application crashes. If you don’t want to use WER for some reason, you can disable it via Group Policy. However, there are times when you might want to use it, such as when you’re testing applications. In those cases, you’ll need to know how WerFault.exe works.
WerFault.exe is responsible for collecting information about the crash and sending it to Microsoft. This includes things like the name of the program that caused the crash, the version number of the operating system, and the error code. Once WerFault.exe receives the report, it starts the process that runs the crashed program again. It does this because it doesn’t want to send out another notification about the same problem.
If the crashed program is still alive, WerFault.exe shuts down the process. Otherwise, it waits for the program to finish executing. After the process finishes, WerFault.ex restarts the crashed program.
This cycle repeats until the crashed program is no longer alive. At that point, WerFault.Ex stops the process.

Tim Wiley was a tech writer for seven years at Recode. In that time, he covered everything from basic browser.js and URL parameters to XHRs, performance, malware, security, enterprise apps, social media, and Windows secrets. He also written about how to hack Signal in 2016 and how to resist, or possibly even conquer, the zero-day threat.