Windows Created a Temporary Paging File: Here’s How To Fix It
If you receive a “The Windows system paging file is being modified, please wait…” error while trying to open Notepad, it could mean one thing: there’s too much data stored in memory. This happens because Windows creates a temporary paging file every once in awhile. If you see this error message, you don’t necessarily have to worry about losing anything important—just move the pagefile to a different location, like a USB flash drive. Here’s how to fix it.
Step #1: Open up Disk Management.
Step #2: Right-click on the hard disk where you want to store the pagefile, and choose New Simple Volume.
Step #3: Name the volume something like “PageFile” and set it to Dynamic.
Step #4: Click OK.
Step #5: Copy the entire contents of the pagefile into the newly created volume.
Step #6: Close out of Disk Management and reboot your computer.
That’s it! You now have a backup copy of the pagefile. When the next crash occurs, you’ll simply restore the pagefile from your backup.
What does pagefile.sys stand for?
The pagefile.sys file is a type of virtual memory file which stores information about temporary data. This file is used by Windows Vista and later versions of Windows. You can find it under the root directory of the OS drive.
When you delete it, the operating system uses free space to create new one. These files are usually located inside the temp folder.
Activate System File Checker.
The System File Checker scans your hard disk drives for errors, missing files, and invalid registry entries. If it finds something wrong, you’ll see a notification about what needs fixing. You don’t even need to reboot your computer; just run the command again later.
If you’re having problems installing programs, updating drivers, or accessing data, here are some things to try:
• Try downloading and running the latest version of Microsoft Security Essentials.
• Make sure you’ve got enough free space on your hard drive.
• Delete temporary Internet files.
• Clear your browser cache.
• Close out old browsers.
Activate Disk Cleanup
The Windows operating system leaves behind many temporary files on your hard disk. These files are usually used while working on a program or document. However, some of these files remain even after you close the application or window. This can slow down your PC. If you do not delete these files regularly, it might eventually lead to serious issues such as crashes. To avoid such situations, you must use Disk Cleanup.
Disk Cleanup allows you to easily clear away temporary files. It scans your entire hard disk and deletes unnecessary files. In addition, it lets you select what type of data you wish to keep. For example, you can choose to save photos, videos, music, documents, etc.
To start cleaning up your hard disk, follow these steps:
1. On the next screen, click OK.
2. Select items to be cleaned up.
3. Choose the location where you want to store the deleted files.
4. Click OK.
5. When the process is complete, click Finish.
6. Restart your computer to make sure everything works properly.
Disable the Audio File System
To disable the AFS, open up the command prompt and type:
DISABLEAUDIOFILESYSETSERVICE
This will prevent Windows from creating the temporary paging file. If you want to turn the feature back on again, just type:
ENABLEAUDIOFILESETTINGSERVICE
You’ll need to restart your computer before the changes are applied.
How to turn the Audio File System back on
To turn the audio file system on, type or paste the following commands into an Elevated Command Prompt: sc config AFSCONFIG_ENABLE1&sc config AFSCONFIG2_ENABLE1
To turn the audio system off, type or copy/paste the following commands into an Elevated Command Prompt: sc delete AFSCONFIG_DISABLED; sc delete AFSCONFG2_DISABLED
You should never run any Windows Updates while logged onto a domain accounts. Doing so will cause it to fail. If you are running a Domain Controller, make sure you do not logon to the machine via a local account. This will prevent the update process from completing successfully.
Force Windows to make a fresh copy of pagefile.sys
The pagefile.sys file is used to store temporary files. If it becomes corrupt, it could cause problems with your PC. Deleting the file might solve the issue temporarily, but it won’t fix the underlying problem. In fact, it could even lead to further issues down the road.
To fix the problem, you’ll need to delete the corrupted pagefile file manually. This process isn’t difficult, but it does require some technical know-how. We’ve included instructions below, along with screenshots, so you don’t have to go digging around online to find out how to do it yourself.
Before you start, we recommend making sure that you’re backed up first. You never know what could happen during this procedure, and it’s always better to be safe than sorry.
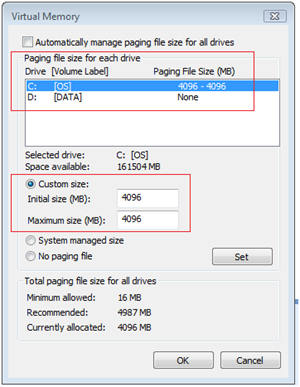
Step 1 – Disable Virtual Memory
Click on “Change” next to “Virtual memory”. Then select “Disable.”
Step 2 – Remove Pagefile.sys
Once inside the command prompt window, type cd %systemroot%\system32 and press Enter. Type attrib +r /d pagefile.sys and press Enter. Now type del /f /q pagefile.sys and hit Enter.
20
Frequently Asked Questions
What does the page file do?
The page file is where Windows stores temporary data while programs run. You’ll notice the size of the page file increasing over time.
Why does my page file grow?
Windows creates additional pages within the page file when needed. For example, if you open a document, Windows needs to store information about the document in the page file. As the number of documents you use increases, Windows must allocate more space in the page file.
How big should I set my page file?
You don’t need to worry too much about the exact amount of space allocated to the page file. However, you shouldn’t let it exceed 20% of your total hard disk space, because if the page file gets full, Windows won’t be able to start up properly.
What Causes the Error “Windows Created a Temporary Paging File” to Show Up?
This error appears frequently on older computers. Windows creates temporary files during installation, repair, uninstallation, and maintenance operations. These files are used temporarily by Windows while it performs tasks such as installing programs or repairing problems.
These files are usually deleted automatically once the task is complete, but sometimes they remain on disk longer than expected. When this happens, Windows displays the following error: “The file system cannot find the path specified.”
There are several reasons why this error might occur. For example, there could be a problem with the hard drive or the operating system. If you’re experiencing this error repeatedly, try checking the following points:
1. Check Disk – Make sure that your computer’s hard drive isn’t damaged. To do this, open the Start menu and select Computer. In the left pane, under Device Manager, double-click the Hard Drive icon. Then, under the Hardware tab, check the box next to the device name. Click OK twice to close both windows.
2. Update Drivers – Sometimes, the latest drivers aren’t installed properly, causing Windows to display errors. Try updating your driver software. Open the Start menu and type “Device Manager” into the Search bar. Select Device Manager from the list of results. Double-click the device whose driver needs updating. Under the Driver tab, make sure that the version number matches what’s listed on the manufacturer’s Web site. If the version number doesn’t match, update the driver manually.
3. Clean Up Junk Files – Some applications, including Microsoft Office, add temporary files to the Recycle Bin. However, some people don’t empty the bin every day. Over time, the contents of the bin accumulate, eventually filling up the entire hard drive. To clean out the Recycle Bin, follow these steps: From the desktop, right-click the Recycle Bin icon and choose Empty Recycle Bin. Press Enter to confirm. Restart your PC.
4. Repair Registry Errors – A registry is a database that stores information about your hardware, software, and settings. Registry errors can cause Windows to display the above error. To fix registry issues, run the Windows System Restore utility. Choose Startup Repair from the Windows Advanced Options Menu. Follow the prompts to restore your computer to a previous state.

Tim Wiley was a tech writer for seven years at Recode. In that time, he covered everything from basic browser.js and URL parameters to XHRs, performance, malware, security, enterprise apps, social media, and Windows secrets. He also written about how to hack Signal in 2016 and how to resist, or possibly even conquer, the zero-day threat.